Installation and User's Guide
| Before you begin
- Read the safety and handling guidelines provided in "Safety and environmental notices".
- Ensure that your current system configuration is working properly.
- Back up all important data before you make changes to storage devices,
such as hard disk drives.
|
The expansion-unit bridge card, switch card, and ESM boards are customer
replaceable units (CRUs). This section contains step-by-step
instructions for removing and replacing each device.
To replace the bridge card CRU in the storage unit, follow the instructions
for removing the bridge card and installing a bridge card.
Attention: Before removing the storage unit
bridge card, you must switch off the storage unit. Refer to "Switching the storage unit on and off", for detailed instructions.
Complete the following steps to remove the storage unit bridge card:
- Switch off the storage unit. Refer to "Switching the storage unit on and off".
- Remove the drive CRUs or filler panels from the left and right of the
bridge card bay. Refer to "Replacing hot-swap drives".
- Squeeze the bridge-card cover (1) clips, and pull the bridge card
cover (1) off.
- Lift the tray handle (2), and pull the tray (3) that
contains the bridge card out of the bridge card bay.

Attention: Make sure the storage unit is switched off before
installing a bridge card. Refer to "Switching the storage unit on and off".
Complete the following steps to
install the storage unit bridge card:
- Make sure the storage unit is switched off.
- Hold the bridge card tray (3) so the tray handle (2) is at
the top of the bridge card tray and pointing outward.
- Slide the tray (3) that contains the bridge card into the bridge
card bay.
- Push the tray handle (2) down, locking the bridge-card tray into
place.
- Replace the bridge card cover (1) by squeezing each of the four
tabs, locking the cover into place.
- Switch on the storage unit. Refer to "Switching the storage unit on and off".
To replace the switch card CRU in the storage unit, follow the instructions
for removing the switch card and installing the switch card.
Attention: Before removing the switch card, be sure to switch
off the storage unit. Refer to "Switching the storage unit on and off". Make note of the switch card settings so you can set
the new card to the same settings. Failure to do so will result in loss
of data.
There is one switch card located between the two power supply/fan units at
the back of the unit. Complete the following steps to
remove the switch card:
- Switch off the storage unit.
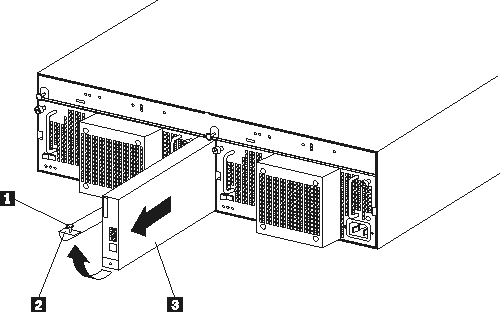
- Locate the blue push pin (1) at the bottom of the switch card
tray.
- Pull out the blue push pin (1).
- Pull up on the switch-card tray handle (2).
- Slide the tray that contains the switch card out of the switch card
bay.

Attention: Before
installing a new switch card, make sure that the switch card settings are the
same as the settings on the switch card being replaced, and that the storage
unit is switched off. Refer to "Switching the storage unit on and off". Failure to do so will result in loss of data.
There is one switch card located between the two power supply/fan
assemblies at the back of the unit. Complete the following steps to
install the switch card:
- Make sure the storage unit is switched off.
- Hold the switch card so the blue push pin (1) is at the bottom of
the card and the tray handle (2) is to the left of the card.
- Hold the tray handle (2) up and slide the card (3)into the
bay until it stops.
- Push the tray handle (2)all the way down; then, push in the
push pin (1).
To replace an ESM board CRU in the storage unit, follow the instructions
for removing an ESM board and installing an ESM board.
There are two hot-swap ESM boards at the back of the unit. You can
remove the ESM board and SCSI cable without switching off power to the storage
unit. Complete the following steps to
remove an storage unit ESM board:
- Power down the server attached to the ESM Board.
- Disconnect the SCSI cable (1)from the ESM Board.
- Locate the orange push pin (4) to the left of each ESM
board.
- Pull the orange push pin (4) out.
- Holding the pin, pull the tray handle (3) out and to the
right.
- Slide the ESM board(2)out of the storage unit.

There are two hot-swap ESM boards at the back of the unit. You can
install the ESM board and SCSI cable without switching off power to the
storage unit. Complete the following steps to
install a storage unit ESM board:
- Hold the board so the tray handle (3) is attached to the bottom of
the tray, and the tray handle (3) is fully extended.
- Slide the ESM board (2) into the bay, and move the handle
(3) to the closed position (left) until it clicks.
- Push in the orange push pin (4).
- Connect the SCSI cable (1) to the ESM board.
- Power on the server attached to the ESM board.
[ Top of Page | Previous Page | Next Page | Table of Contents | Index ]