Installing Layered Products This chapter details how to install Apex and Summit layered products.
The following topics are covered in this section:
- Installation Prerequisites
- Installation Steps
- Ada Analyzer
- AXI (Ada/X Interface)
- SoDA
- Apex Embedded
- TestMate
Installation PrerequisitesBefore starting the installation, you need:
- Installation instructions including this manual.
- The $APEX_HOME location where Apex or Summit is installed.
- The license file. From an Apex/Summit shell, you can reference this as $APEX_LICENSE_FILE. This file is normally kept in the file rational_dir/config/license.dat or server_name.dat.
Installation Steps
- 1 . Log into any workstation that:
- Gives you access to the CD-ROM drive or tape drive
- Mounts the file system(s) into which you will load the layered product release
- 2 . Go to the Rational root directory, which is referred to as rational_dir throughout this guide:
rational_dir
For rational_dir, supply a pathname such as: /vendor/rational. The rational_dir directory needs to be visible to all Apex users across the NFS file system for multiple-server network access.
- 3 . Apex layered products are delivered on CD-ROM or magnetic tape. For CD-ROM installs, follow steps
4 & 5 in Chapter 1. For tape installs, follow step 6. Return to this section and do step 4.- 4 . Load the layered product components from the product media:
product.x.y.z/install % ./install
Warning: Do not change the default tape drive unless you are sure it is incorrect.
- 5 . If you are installing the layered product for the first time, or if the license requirements have changed since the last time you installed it, you need to license it.
- a .
Enter:
This script will help you gather the information you need for configuring your layered product license.
After running this script, contact Rational and provide us with the information in the LICENSE_INFORMATION file. The phone numbers for Rational are also in this file.
- b .
After contacting Rational and receiving your license key(s), use your favorite text editor to add them to your license file. This file should have been specified by you when you ran get_license_info.
For example, run vi to edit this license file:
Take the FEATURE, UPGRADE or INCREMENT lines and include them in the file. You can only have one FEATURE line for each license feature. Duplicates will be ignored. The first one in the file takes precedence.
- c .
Having updated your license file, enter:- 6 . Enter:
If the license manager is not running, or if it is not installed correctly, post_install will display an error message. If necessary, check that your license file is correct and restart the daemons. If post_install still does not work, contact Rational Customer Support.
The post_install script will perform step 7. It prompts you, asking if you want it to do this.
If you want this layered product started by Apex automatically, answer "yes" when asked to update the startup file.
Note: You must run post_install on the architecture that was just installed.
- 7 . Create a symbolic link to the current release:
rational_dir% ln -s releases/product.x.y.zproduct
This allows Apex and layered product users to reference rational_dir/product, thereby minimizing the impact of new layered product installations on their personal startup files.
If the symbolic link rational_dir/product already exists and is pointing to a previous release of the layered product, switch it to point to the new release when you are ready to make the new release the default release for your user community:
rational_dir% rmproduct% ln -s releases/product.x.y.z product
Now users will get the new release of this layered product the next time they start Apex.
The following layered products are covered in the remainder of this chapter.
- Ada Analyzer
- AXI (Ada/X Interface)
- SoDA
- Apex Embedded
- TestMate
Warning: Apex Native must be installed for these layered products to work. For Apex/ClearCase installation see Installing Apex/ClearCase.
Ada AnalyzerThe Ada Analyzer defines four separately installable components:
- 1 . Ada Analyzer Component: Contains the Ada Analyzer executables, all menus and dialogs, and all on-line documentation and help. This component is not option and must be installed.
- 2 . Ada Repair Component: Contains the Ada Repair Executable. Note that you must install the Ada Analyzer component if you want to use Ada Repair. You do not need an Ada Analyzer license to run Ada Repair, but it does depend on several sub-components of the Ada Analyzer component
- 3 . Customization Component: Contains four subsystems for use in customizing the Ada Analyzer; the aa_utilities.ss (code only) subsystem, and the rule_library.ss, metrics_library.ss, and ada_analyzer.ss (source code) subsystems. This component is optional and may be installed if you intend to make modifications or additions to the Ada Analyzer.
- 4 . Testing Component: Contains the test_ada_analyzer.ss subsystem with test drivers, the aa_testing/test_input.ss subsystem with test input software, and the aa_testing/test_output_golden directory containing golden test results for regression testing.This component should only be installed if the customization component is also installed. It can be used to regression test customizations made to the Ada Analyzer but may not be required if only additions are made to the Ada Analyzer.
To use the Ada Analyzer and Ada Repair with Rational Apex, users can do some optional setup for themselves by following the instructions in Chapter 1 of the Ada Analyzer User's Guide. Customizers may choose to copy, move, or rename customizations from previous releases for the new release. All Ada Analyzer users should logout of existing Apex sessions and login to new sessions before using the newly installed Ada Analyzer Release.
The licenses needed for the Ada Analyzer are:
Ada Analyzer ada_analyzer
Ada Repair ada_repair
AXI (Ada/X Interface)AXI (Ada/X Interface) comes with a separate installation guide. Here is a complete list of the AXI licenses. These licenses have changed for 4.0 and are now platform independent:
AXI/Ada 83 axi
AXI/Ada 95 axi.ada95
SoDAThe license needed to run SoDA is:
SoDA soda
During installation, you will have the option of choosing which SoDA components to load. These components are described below.
Required Components
There are four components that are required for all installations; you must load them:
- SoDA Common Component, containing document templates, X resources, apiclients file updates, and so on
- SoDA Components for platform, the platform-specific executables
- FrameMaker+SGML Component, a complete, embedded FrameMaker release upon which SoDA depends
- Frame Component for platform, the platform-specific FrameMaker executables and libraries.
The SoDA installation process is not optimized for heterogeneous networks (more than one UNIX platform). If you need to install more than one version of SoDA, please contact Rational Technical Support.
Optional Components
There are additional components that you may need to load, depending on the needs of your project:
- Apex Domain for platform, containing source-domain definitions, executables, and so on for integrating SoDA and Rational Apex. You must load it to use SoDA with Apex.
- TestMate Domain for platform, containing source-domain definitions, executables, and so on for integrating SoDA and TestMate. You must load it to use SoDA with TestMate.
- Rose Domain for platform, containing source-domain definitions, executables, and so on for integrating SoDA and Rational Rose. You must load it to use SoDA with Rose.
- ClearCase Domain for platform, containing source-domain definitions, executables, and so on for integrating SoDA and Rational ClearCase. You must load it to use SoDA with ClearCase.
- SoDA Training, a platform-independent tar file. Load it only if you have SoDA users who are planning to attend Rational's SoDA training class. (Further instructions on completing the installation of the SoDA Training component are provided with the training material.)
- SoDA Demo, a platform-independent component for demonstrating SoDA features. It is intended primarily for use by Rational personnel. Unless requested by your Rational representative, you do not need to load this component.
- International Dictionaries, containing international language dictionaries, character sets and fonts for FrameMaker.
SoDA Control Options
You will be prompted during installation to provide a control type for use during checkin of a FrameMaker+SGML file. Here are the two options for SoDA control:
- Storage in binary format or MIF (Frame's Maker Interchange Format) upon checkin
- Document locking (Frame's View Only format) upon checkin and document unlocking upon checkout
Storage Formats
You can specify the way in which versions of controlled documents are stored in the CMVC database. The two choices are:
- Binary format, which is the normal format of FrameMaker+SGML documents. This format is more compact and requires less time for FrameMaker+SGML to save and open.
However, CMVC does not store versions of binary files efficiently. Each version is stored as a full copy of the current binary file. Over time, as many new versions are checked in, the CMVC database will grow very large even if each version contains only minor changes.
- MIF, which is an ASCII representation that fully describes the contents of FrameMaker+SGML documents. MIF can be several times larger than the equivalent binary format and requires more time for FrameMaker+SGML to save and open (because FrameMaker+SGML must convert the MIF from/to binary).
However, CMVC stores versions of ASCII text files efficiently. Only one version is stored as a full copy of the original file. All other versions are stored as differentials. Over time, as many new versions are checked in, the CMVC database does not grow too large if most versions contain only minor changes.
Because MIF files are often quite large, calculating the differences between versions can take some time, thereby slowing the checkin.
A Binary Example
For example, a 10 KB document is controlled in binary format, and its initial version takes up 10 KB in the CMVC database.
The document is checked out, additions are made to it, and its size is now 15 KB. The document is checked in, and its two versions take up 25 KB (10 KB + 15 KB) in the CMVC database.
The document is checked out again, minor changes are made to it, and its size remains 15 KB. It is checked in again, and its three versions take up 40 KB (25 KB + 15 KB) in the CMVC database.
A MIF Example
The same 10 KB document is controlled in MIF, and its initial version takes up 30 KB in the CMVC database. (For this document, the MIF was three times larger than the equivalent binary format. Your mileage may vary.)
The document is checked out, additions are made to it, and its size (in binary format) is now 15 KB. The document is checked in, and its two versions take up 36 KB (30 KB + 6 KB in differences) in the CMVC database.
The document is checked out again, minor changes are made to it, and its size (in binary format) remains 15 KB. It is checked in again, and its three versions take up 37 KB (36 KB + 1 KB in differences) in the CMVC database.
Document Locking
When documents are controlled and checked in, their UNIX file permissions are set to be read-only (r--r--r--). However, there is no easy way to tell if a document is read-only from within FrameMaker+SGML.
You can tell SoDA to lock documents when they are checked in and unlock them when they are checked out. When a document is locked (in FrameMaker+SGML View Only format), it is apparent in FrameMaker+SGML that the document is not editable —— you cannot select text or type in the document until it is checked out and unlocked.
Installing SoDA With Rational Rose
During installation you may be asked if you want to use SoDA with Rational Rose. If you answer yes, you must also provide the location of your Rose installation. The install process will automatically configure SoDA to use the version of Rational Rose you have specified.
Installing SoDA With Rational Apex
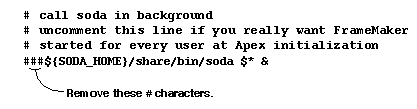
If you are installing SoDA with Rational Apex, and if you would like apexinit to automatically start SoDA for all Apex users, use your preferred text editor to adjust the soda.start script as shown below:
Normally, it is better not to make this adjustment unless all Apex users will also be regular SoDA users. Usually, only some Apex users are regular SoDA users.
Reconfiguring SoDA
Sometimes it is necessary to reconfigure SoDA after installation, for example to specify a new Rose or Apex installation, or to change a configuration option. The SoDA configuration described in this chapter is performed by the post_install utility, described under Installation Steps. Use this utility to reconfigure SoDA.
Licensing may also be reconfigured after install by using the get_license_info script, also described under Installation Steps.
Using SoDA
Once you have completed the SoDA installation, you may start SoDA by running the soda command. For further information, see the instructions for SoDA users in Chapter 1, "Getting Started," of Using SoDA 3.0.
Apex EmbeddedNo additional setup is required for Apex Embedded users once installation is complete. Here is an example list of Apex Embedded licenses for each version of the product:
TestMateNo additional setup is required for TestMate users once installation is complete.
Here is a complete list of the TestMate licenses:
| Rational Software Corporation http://www.rational.com support@rational.com techpubs@rational.com Copyright © 1993-2002, Rational Software Corporation. All rights reserved. |