rgb_logo_pc_250.jpg (7844 bytes)

Getting started with Purify: C/C++ code


The basic steps

With Rational ® Purify ® , you can deliver cleaner code in a few easy steps:

  1. Run your program with Purify to collect:
    • Error data
    • Coverage data (if you have PureCoverage ® installed)
  2. Analyze the error data and correct your source code.
  3. If you've collected coverage data, analyze it to find any parts of your code that you have not Purify'd ® .
  4. Rerun your program with Purify.

This chapter shows you how to use Purify in Microsoft Visual Studio. But you can also use Purify independently of Visual Studio. Read "Using Purify standalone" and "Testing with Purify's command-line interface."


Running a C/C++ program with Purify

Open your project in Visual Studio, then engage Purify from the Purify toolbar.

Set Purify to collect coverage data, as well as checking for errors and memory leaks.

1devtoolbarpurify.GIF (2988 bytes)

Build and execute your program using commands from the Visual Studio Build menu. (To get the maximum level of detail in Purify error reports, build your program with debug and relocation data.)

More information? For information about building programs with debug and relocation data, look up debug data in the Purify online Help index.

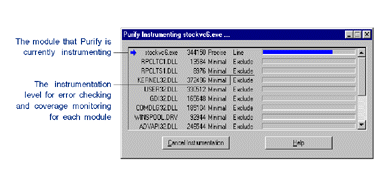
Purify copies the program and each library it calls, then instruments the copies using Object Code Insertion (OCI) technology. The instrumentation process inserts instructions that validate every read, write, and allocation and deallocation of memory. If you're collecting coverage data, Purify also inserts instructions that increment counters when you exercise specific lines and functions.

Purify reports its progress as it instruments each module.

2-inst-small.gif (16474
									bytes)
Click to enlarge

Purify instruments each module at a default instrumentation level, but you can customize the instrumentation level to provide more or less detail for special cases.

More information? For an explanation of instrumentation levels and how to use them, read "Customizing instrumentation". For more detail, look up instrumenting in the Purify online Help index.

Purify caches the instrumented copy of each module. When you rerun a program, Purify saves time and resources by using the cached modules, re-instrumenting only those that have changed since the previous run.

As you exercise your program, Purify detects run -time errors and memory leaks and displays them in an Error View tab in the Purify Data Browser window.


Click to enlarge

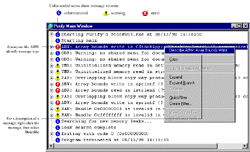
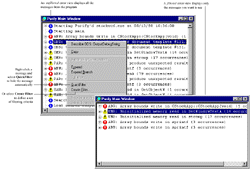
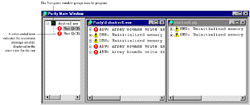
More information? Look up error view in the Purify online Help index.

Note: If you're debugging client/server and multi-process applications, you can debug several processes and see the error reports for each running application simultaneously. To do this, run each process in a separate instance of Visual Studio with Purify engaged. Alternatively, you can use the standalone Purify user interface. See " Using Purify standalone ".


Seeing all your errors at a glance

Purify displays error and warning messages about run-time errors and memory leaks, and informational messages about the progress of your program's execution.


Click to enlarge

When you exit the program, Purify reports memory leaks. In addition to memory leaks, you can set Purify to report memory in use at exit and handles in use at exit.

More information? Look up error and leak settings in the Purify online Help index.

When identical errors repeat

An error often repeats many times in a program, particularly if it occurs inside a loop. To provide a concise overview of a program's errors, Purify by default displays each error message only once, the first time an error occurs, and then updates a counter whenever the error repeats.


Click to enlarge

More information? If you want Purify to display each occurrence of a message individually, instead of reporting counts, you can change the default setting. Look up error and leak settings in the online Help index.


Focusing on critical errors first

A large program can generate hundreds of messages. To focus on the most critical error messages quickly, create filters to hide all other messages from the display.

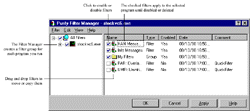
You can filter messages individually, or you can filter them based on their type and source. Consider hiding all informational messages, for example, or all messages originating from a specific file.


Click to enlarge

Once created, error filters apply to the current run and to all future runs of the program until you disable them. Disabling a filter causes hidden messages to be redisplayed in the error view.


Working with error-data filters

Purify filters are very flexible. Click the Filter Manager tool to create individual filters or groups of filters, and to apply them to specific programs or modules. You can also create global filters that apply to all programs and modules. And you can share filters, which Purify saves as .pft files, with other members of your team.


Click to enlarge

More information? Purify provides filters for coverage data as well as for error data. Look up filtering data in the Purify online Help index.

In addition to filtering, you can also use Purify's PowerCheck feature to focus on specific modules and simultaneously minimize instrumentation time. For information about the PowerCheck feature, read "Customizing instrumentation" .


Analyzing Purify error data

You can expand Purify messages to pinpoint where errors occur and to obtain diagnostic information for understanding why they occur.

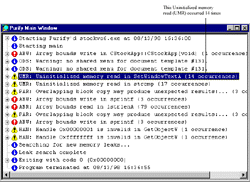
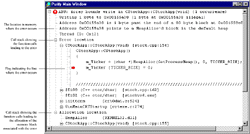
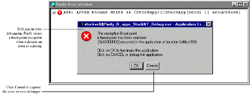
Here's an example of an expanded ABW (array bounds write) error message:


Click to enlarge

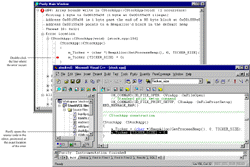
The level of detail provided in call stacks depends on the availability of debug and relocation data. Even if you build your program in release mode, you can still get the highest possible level of detail. For more information, look up debug data, release builds in the Purify online Help index.

You can customize the format of Purify's messages. For example, you can increase the number of lines of source code that are displayed, or include instruction pointers and offsets to make locating errors easier.

More information? Look up preferences, source code in the Purify online Help index.


Correcting errors

Purify makes it easy to correct errors.


Click to enlarge

More information? Look up source code in the Purify online Help index.


Checking code coverage

To make sure that you find errors in your code wherever they occur, use Purify to monitor code coverage each time you run your program. With Purify's coverage feature, you can check that you're exercising all your code, especially those parts that have recently been added or modified.

Purify displays coverage data in views that you can sort to find the largest gaps in your testing.

10-modview-small.GIF (9185 bytes)

Click to enlarge

Purify can also display line-by-line coverage information marked directly on a copy of your code in an Annotated Source window. The color of each line of code indicates whether it is tested, untested, or partially tested, so that you can tell at a glance where you need to tighten up your testing.

11-annsrc-small.GIF (7701 bytes)

Click to enlarge

Based on the coverage data, refine your approach to exercising your code to make sure you are testing all the critical lines and functions. If you are testing manually, try different menu commands, or enter new values for variables. If you are testing automatically, revise or add test scripts.

More information? Look up coverage data in the Purify online Help index.


Comparing program runs

When you are satisfied that you've made good progress in eliminating errors, and that you can exercise the parts of your program that most need testing, rebuild. Then rerun the program under Purify.

After rerunning your corrected program, you can easily compare runs to verify your corrections. Purify's Navigator window, which you can display from the Purify View menu, helps you keep track of multiple runs and multiple programs.


Click to enlarge

More information? You can compare coverage data from different runs using the Compare Runs tool diff.GIF
						(933 bytes).  Look up comparing runs in the Purify online Help index.


Saving Purify data

You can save Purify error data from a run in order to analyze it later, share it with other members of your team, or include it in reports. Purify can save data in the following formats:

More information? Look up saving data in the Purify online Help index.


Advanced features for C/C++ users


Customizing instrumentation

Purify uses one of the following error-checking instrumentation levels as the default for each module, depending on the module's size and the availability of debug and relocation data:

  • Precise instrumentation provides full run-time error detection, to pinpoint problems in any part of your program.
  • Minimal instrumentation improves Purify's performance while providing a basic level of error detection.

For coverage monitoring, Purify uses one of the following levels as the default:

  • Line-level instrumentation, which reports line-by-line coverage data
  • Function-level instrumentation, which improves performance but reports only function-by-function coverage data

             13-power-small.GIF
				(5599 bytes)

Click to enlarge

You can override the default and specify the level for each module to meet your own requirements.

         14-power_mo-small.GIF
				(8501 bytes)


Click to enlarge

Try using the Precise error level for the most critical modules in your program and the Minimal level for the others. Later, you can change the Minimal level to Precise for a thorough check of the other modules

More information? Look up instrumentation levels and powercheck in the Purify online Help index.


Using just-in-time debugging

Purify's just-in-time debugging support provides instant access to your debugger when you need to solve tough problems. Click to enable Break on Error. Purify now stops your program just before an error executes so that you can debug it. You can also run a Purify'd program directly under the debugger.


Click to enlarge

To quickly debug only the most critical errors in your program, use Break on Error together with Purify filters. First, filter out all the less critical messages, then enable Break on Error. Purify breaks only for the unfiltered messages. When you're ready to debug the remaining errors, just disable the filters.

More information? Look up break on error tool in the Purify online Help index.


Using Purify standalone

When you don't need all of Microsoft Visual Studio's resources, you can use Purify standalone. Purify's independent user interface provides the same error-detection and coverage capabilities as when you use Purify integrated with Visual Studio.

Note: You can also use Purify's independent user interface while continuing to work integrated with Visual Studio by deselecting Embed Data Browsers in the Purify Settings menu.

To use Purify as a standalone application, launch Purify from the Start menu. Then click Run in the Purify Welcome Screen to display the Run Program dialog.


Click to enlarge

Purify instruments your code and displays the results in a Data Browser window.

More information? For information about a tool, menu command, or dialog, click and then click the item.

 
Testing with Purify's command-line interface

Using Purify's command-line interface, you can use Purify with existing makefiles, batch files, and Perl scripts. For example, if you have a test script that runs a program, you can easily modify the script to instrument and run the program. To do this, change the line that runs Exename.exe to:

purify Exename.exe

Alternatively, to run the instrumented version of Exename.exe consistently throughout your tests, add this line to the beginning of your test script:

purify /Replace=yes /Run=no Exename.exe

This line instructs Purify to save the original Exename.exe to a .bak file, and to instrument Exename.exe but not to run it at this time. Now, whenever your test script runs Exename.exe, it runs the instrumented version of the program, providing Purify's detailed diagnostics.

To collect coverage data as well as error data when you run a program from the command line, use the /Coverage option:

purify /Coverage=yes Exename.exe

You can run Purify without the graphical interface by using the /SaveTextData option. This option saves Purify's diagnostic messages to a text output file. You can use the error and warning messages in this file as additional criteria for your test results.

More information? Look up command line in the Purify online Help index.


Extending error checking with Purify API functions

Purify includes a set of API functions that extend its error checking capabilities and give you greater control over tracking errors.

Using Purify's API functions, you can set and test memory state, and search for memory and handle leaks. For example, by default Purify reports memory leaks only when you exit your program. But you can use the API function PurifyNewLeaks to check for leaks more frequently. Click the NewLeaks tool newleaks.GIF (950 bytes)  to call PurifyNewLeaks while your program is running, or include PurifyNewLeaks at key points in your code. Purify reports any new memory leaks it has detected since the last time you called the function. This periodic checking enables you to track memory leaks more closely.

You can call Purify API functions from the Purify View menu as your program executes. You can also call them from the QuickWatch dialog in the Visual Studio debugger as well as by including them in your code.

More information? For the complete listing of Purify API functions related to coverage monitoring, look up api function list. For instructions on using the functions, look up api functions, using in the Purify online Help index.


Using Purify in an integrated environment

Rational Software tools integrate into your working environment to help you do your job more effectively and efficiently.

For example, you can use Purify with Rational ClearQuest , Rational's change request management tool, and with Rational Robot and Rational Visual Test ® , Rational's functional testing tools.

Using Purify with ClearQuest

If you have ClearQuest installed, you can submit a defect as soon as Purify detects an error or warning, or when you find a coverage problem.


Click to enlarge

Purify automatically supplies entries for a number of fields in the submit form and specifies the category of error. You can easily attach Purify data files ( .pfy ) to further document the error.

Using Purify with Rational testing tools

If you have Robot installed, you can set a playback option in Robot to collect Purify error and leak data when you run a Robot test script. Purify detects memory errors as the code is executed. Robot also includes a playback option that allows you to collect code coverage information as well as error and leak data.

If you have Visual Test installed, you can run Purify on the program that Visual Test is exercising from within Visual Studio. If you are using a test harness to run Visual Test scripts, you can easily modify it to run Purify automatically as it exercises the program.

More information? Look up clearquest, robot, and visual test in the online Help index, and refer to the ClearQuest, Robot, and Visual Test documentation.


Now you're ready to put Purify to work on your C/C++ code. Remember that Purify's online Help contains detailed information to assist you.


Back | Next | Index | Table of contents


Copyright © 1996, 2001 by Rational Software Corporation. All rights reserved.