Framework Wizard Add-In
ContentsThis chapter is organized as follows:
- Overview
- Activating the Framework Wizard Add-In
- Creating a New Model from a Framework
- Creating and Deleting Frameworks
OverviewThe Framework Wizard Add-In provides a library of frameworks that can be used as templates when creating new models. If the Framework Wizard Add-In is active, the File > New command in Rational Rose displays a dialog box from which you can choose one of the available frameworks. By choosing an appropriate framework when you create a new model, the model is automatically initialized with a predefined architecture and a set of reusable model elements. This way, you can focus your modeling efforts on the parts that are unique to your system, instead of reinventing the wheel.
The Framework Wizard Add-In also provides a wizard to help you add additional frameworks. The Wizard is started by opening the Make New Framework framework.
Note: The Framework Wizard Add-In is only available on Windows and only in some Rational Rose editions. Also, in order to create models from frameworks and add new frameworks, the Framework Wizard Add-In must be active (refer to Activating the Framework Wizard Add-In).
Activating the Framework Wizard Add-InIn order to create models from frameworks and add new frameworks, the Framework Wizard Add-In must be active. It is active if the File > New command in Rational Rose displays a Create New Model dialog box. If the File > New command just opens a new empty model, the Framework Wizard Add-In is not active.
To install the Framework Wizard Add-In:
- 1 Run the Rational Rose setup program.
- 2 Select a custom install, and select the Rose Framework Add-In feature. If the Framework Wizard Add-In feature is not present, the add-in is not available in your Rational Rose edition.
To activate the Framework Wizard Add-In:
- 1 Click Add-Ins > Add-In Manager in Rational Rose.
- 2 Select the Framework Wizard option and click OK. If the option is not present, the Framework Wizard Add-In is not installed.
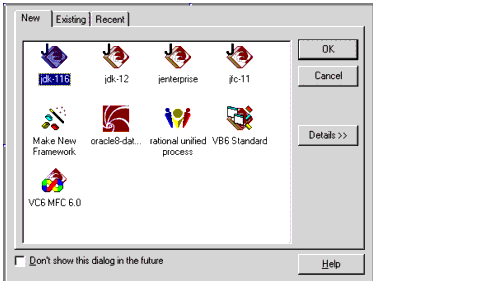
Creating a New Model from a FrameworkTo create a new model from a framework
Figure 98 Create New Model Dialog Box
- 2 Open the framework that corresponds to the system you are going to develop.
A new model is created and initialized with the contents of the chosen framework. (If you don't want to use any of the frameworks, click Cancel. A new model with only the default contents is created.)
- 3 Save the new model and give it a name by clicking File > Save As.
Creating and Deleting FrameworksRational Rose provides you with a Framework Wizard that helps you create a new framework and add it to the framework library. To use the Framework Wizard, the Framework Wizard Add-In must be installed and activated (refer to Activating the Framework Wizard Add-In).
The Framework Library
The Framework Wizard Add-In provides a library of predefined frameworks. The frameworks are located in the \Framework\Frameworks folder in your Rational Rose installation folder. When creating a new model, you can choose to create the model from one of the listed frameworks. The set of available frameworks is displayed with the File > New command.
In the framework library, all files that work together to define a specific framework are located in a folder with the same name as the framework. Each framework is defined by the following files:
- FrameworkName.mdl, which contains the model framework itself. This model is an ordinary Rational Rose model.
- FrameworkName.ico, which includes the icon that symbolizes the framework in the Create New Model dialog box. If there is no .ico file, Rational Rose displays a default icon for the framework.
- FrameworkName.rtf, which includes a description of the framework that appears in the Create New Model dialog box when the user clicks Details. If there is no .rtf file, default description text appears.
- Parameters, which holds the name of the diagram that is initially opened for models created from this framework. The Framework Wizard automatically creates this file and enters the name of the diagram as a line with the following syntax: StartDiagram=ParentPackage / DiagramName. For example: StartDiagram=Logical View / Framework Overview.
Creating a New Framework
- 1 Create and save a model with the contents of the framework in any folder. That model will be used as the template when creating new models from this framework.
- 2 Write a description of the framework in any word processor and save the document in RTF (Rich Text Format) format in any folder.
- 3 Use a drawing tool to create an icon that symbolizes the new framework. Save the icon as an .ico file in any folder (or, look for a suitable existing .ico file).
- 4 Click File > New.
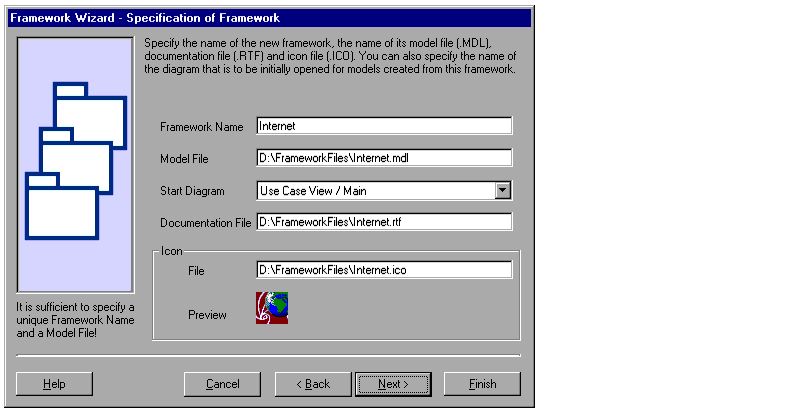
- 5 Open the "Make New Framework" framework, which starts the Framework Wizard. (If the welcome page appears, click Next.)
Figure 99 Framework Wizard Specification Page
- 6 In the Framework Name field, specify the name of the new framework. The name must be unique among the existing frameworks, and it can only contain characters that are allowed in folder names.
- 7 In the Model File field, specify the name and location of the file that constitutes the framework model. (To browse to the file, click in the field. Then, click the displayed button.)
- 8 Click in the Start Diagram field to specify a diagram that is to be initially opened for models created from this framework. The specified model opens. Click the arrow to the right of the Start Diagram field and select one of the diagrams.
- 9 Specify the name and location of the documentation and icon files in the Documentation File and Icon File fields. (To browse to a file, click in the field. Then click the displayed button.)
- 10 Click Next.
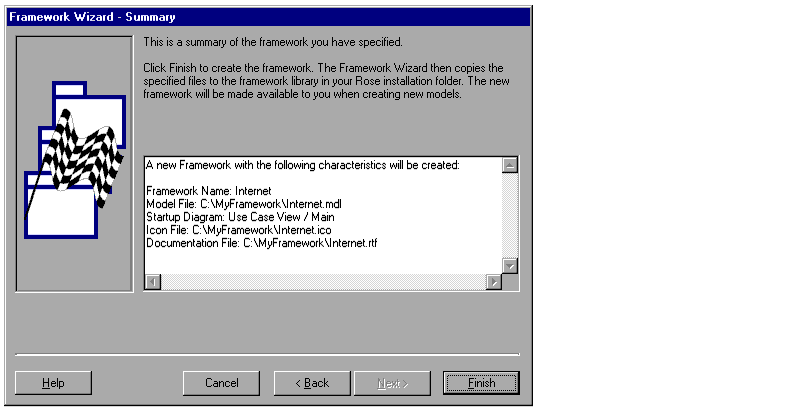
Figure 100 Framework Wizard Summary Page
- 11 If you are satisfied with the framework specification, click Finish. Otherwise, go back and change your settings.
Changing or Deleting a Framework
To change the contents of a framework model, its icon, its description, or the initial diagram to be opened, update the appropriate file in the framework's folder.
To delete a framework, delete its folder from the \Framework\Frameworks folder.
| Rational Software Corporation
http://www.rational.com support@rational.com techpubs@rational.com Copyright © 1993-2001, Rational Software Corporation. All rights reserved. |