Configuring Oracle for RequisitePro
Microsoft, Windows, and Windows NT are either registered trademarks or trademarks of Microsoft Corporation in the United States and/or other countries.
Oracle, Oracle7, Oracle8, and SQL*Net are trademarks or registered trademarks of Oracle Corporation.
Rational, the Rational logo, Requisite, and RequisitePro are trademarks or registered trademarks of Rational Software Corporation in the United States and in other countries.
All other names are used for identification purposes only and are trademarks or registered trademarks of their respective companies.
Copyright © 1998-2000 Rational Software Corporation. All Rights Reserved.
Contents

Purpose
Introduction
Prerequisites
- Required Software
- Oracle Database Administration
- Platform Compatibility
Creating an Oracle Schema for RequisitePro
- Schema Creation Scripts
- Installing and Copying the RequisitePro Scripts
- Editing Scripts
- Creating a Schema
- User ID for Accessing Oracle Database
Using Multiple Projects within an Oracle Database
Connecting Projects Across Databases
- Creating a reference to the remote database instance
- Creating a database link to the remote database
- Defining database aliases on each RequisitePro client
Setting Up PCs for Oracle Access
Creating a Project in Oracle
Archiving and Baselining an Oracle Project
Purpose
This document provides information about configuring Rational RequisitePro for use with an Oracle database server. It includes:
- database management information for setting up an Oracle schema to accommodate Requisite projects,
- instructions for accessing an Oracle host from the client PC using Oracle's SQL*Net or Net8 Easy Configuration tool, and
- a procedure for creating a RequisitePro project in the Oracle database.
These instructions are intended for use by Oracle database administrators, system administrators, and RequisitePro project administrators.
Introduction
RequisitePro offers the capability of using Oracle7 or Oracle8, as well as Microsoft® Access and SQL Server, for your RequisitePro project database. The use of Oracle offers significant power and expandability to your organization's implementation of RequisitePro.
To create and access RequisitePro projects in the Oracle database, follow the instructions in this document for enabling your Oracle database compatibility. RequisitePro supports multiple projects within a single Oracle schema. Refer to Creating a Project in Oracle for instructions on adding an Oracle database project within RequisitePro. Use the same schema name for each of your RequisitePro projects.
Prerequisites
This document assumes that you have Oracle installed on your LAN and the Oracle client software installed on your PC. Refer to the Oracle documentation for all questions regarding that product.
The following installation and configuration tasks must be accomplished prior to performing the RequisitePro/Oracle integration outlined in this document.
Required Software
- Rational RequisitePro, version 2002.05.00
- Oracle version 7.3.4 or greater, server and client software
Oracle Database Administration
Notice to database administrator:
For proper execution of the RequisitePro application, be sure to set the initialization parameter, OPEN_CURSORS, to at least 110.
In order to configure access to Oracle for RequisitePro projects, the database administrator must establish the following:
- Oracle database server name (TCP/IP Host Name)
- Oracle database alias or service name
- Oracle schema name for storing RequisitePro projects (see procedure below)
- your user ID for logging on to the Oracle database
- your user password for logging on to the Oracle database
The following sections provide instructions for configuring the last three of these items.
Platform Compatibility
RequisitePro database implementation is compatible with all Oracle-supported platforms.
Creating an Oracle Schema for RequisitePro
Oracle database administration allows the creation of multiple schemas within your Oracle database instance. Use the scripts listed below to create a RequisitePro user and schema within Oracle for storing your projects. The RequisitePro scripts are designed to initially allocate disk space for the various database tables and indexes that are used by RequisitePro, based on the following approximations:
- 25 projects
- 250 documents (10 per project)
- 125 document types (5 per project)
- 125 requirement types (5 per project)
- 1,250 user defined attributes (10 per requirement type)
- 125 user groups (5 per project)
- 100 users
- 12,500 requirements (500 per project)
- 12,500 discussions (500 per project)
The scripts simply provide an initial size for the RequisitePro schema. They in no way imply any constraints on size or number of projects.
Extents are set to the same size as the initial allocations. They define additional table space that Oracle will allocate if the original allocation becomes insufficient.
As database administrator, you can customize the scripts to adjust the table space allocations for tables and indexes in order to accommodate your organization's intended use of RequisitePro. See the section Editing Scripts, below.
Schema Creation Scripts
The following scripts are used for creating a RequisitePro schema within your Oracle database. They can be run automatically by executing the main script, CREATE_REQPRO, as described in the procedure Creating a Schema, or you can run them individually as needed.
CREATE_REQPRO. Establishes a log that can be used to review the results of running the script and runs the other scripts, listed below.
TABLESPACE. Creates table spaces for data and indexes. Creates disk files to support these table spaces.
CREATE_USER. Creates the default RequisitePro user (REQPRO) and password (REQPRO) and connects to the database with that user ID.
TABLES. Creates tables for the RequisitePro database.
PRIMARY. Creates primary keys for each table in RequisitePro.
INDEXES. Creates indexes for the RequisitePro database.
FOREIGN. Creates foreign key relationships between tables.
FUNCTIONS. Creates customer-defined functions for use within RequisitePro.
SEQUENCE. Creates sequences and triggers for auto-sequencing primary keys.
PROCEDURES. Creates stored procedures for use within RequisitePro.
DATA. Inserts data into the RqKeys and RqRequisite tables.
GRANT_ROLE. Creates a user role with access to the RequisitePro schema objects.
Installing and Copying the RequisitePro Scripts
Note: The schema creation scripts are included on your Rational Windows Solutions media in the following location:
CD-ROM:\\RequisitePro\database\Oracle\To manually copy the scripts from the CD, go directly to step 6 below; to install the scripts using the Rational Software Setup installation program, begin at step 1.
To install the RequisitePro Oracle database creation scripts:
- Run the Rational Software Setup program, which is included on your Rational Solutions for Windows CD.
- At the screen "Choose Product to Install," select the Rational RequisitePro product.
- At the screen "Setup Configuration," select the Custom/Full installation option.
- At the screen "Choose Features," under Rational RequisitePro, select the Oracle Setup option.
- Complete the installation program. By default, the scripts are installed at the following location on your local machine:
C:\Program Files\Rational\RequisitePro\database\Oracle - Copy the scripts to a subdirectory on your Oracle database server. We suggest that you create a "sql" directory below the home directory on the server.
Note: If your database server is running on an international operating system, be sure that the path to these scripts does not include folders with double-byte character names.
Editing Scripts
Modifying the User Name and Password (Optional)
If you want to create the RequisitePro schema with a different entry than the default user name and password values of "ReqPro", modify the following entries:
DEFINE USR=reqpro DEFINE PWD=reqproNote: Do not use Non-English characters when entering the password for the schema.
Specifying the Path for the Schema Scripts
Edit the DEFINE PATH entry to indicate the full path where the RequisitePro SQL scripts are located. The suggested path (from "Installing and Copying the RequisitePro Scripts," above) is:
DEFINE PATH="$HOME/sql/"Note: If your environment limits your path to a maximum 8-character name for directories, be sure to reflect this format in your entry.
Indicating Data and Index Files Directory
Edit the DEFINE ORACLE_DATA entry to indicate the path and directory where the data file for the data table space will be created:
DEFINE ORACLE_DATA=<full path>/ORACLE_DATA/Edit the DEFINE ORACLE_INDEX entry to indicate the path and directory where the data file for the index table space will be created:
DEFINE ORACLE_INDEX=<full path>/ORACLE_INDEX/Specifying a Temporary Tablespace
Edit the DEFINE TEMP entry in the CREATE_REQPRO script to assign temporary tablespace for storing temporary objects for the user's operations.
DEFINE TEMP=TEMPMake sure that the value for this entry is a valid, existing tablespace in your Oracle database. Some versions of Oracle use "TEMPORARY_DATA" rather than "TEMP." Your installation of Oracle may contain a custom name for the temporary tablespace.
Customizing Disk Space Allocation for Database Objects
The schema creation scripts are designed to allocate disk space for the various database tables and indexes that are used by an average set of RequisitePro projects, as described in Creating an Oracle Schema for RequisitePro.
If you anticipate a much larger or smaller requirement for your organization's use of RequisitePro, you can customize the disk space allocation specified in the CREATE_REQPRO script to accommodate your projected capacity.
Edit the following sizing variables:
SMALL = 10K MEDIUM = 100K LARGE = 1000K REQS = 6000K REQHIST = 75000K Note: The last two variables, REQS and REQHIST, are used for the requirements (RqRequirements) and requirement history (RqRequirementHistory) tables, respectively.
Edit the DEFINE DATA_SIZE and DEFINE INDEX_SIZE entries to reflect the change in the total size of the database caused by your edits to the sizing variables.
Modifying the Limits of the VARCHAR2 Data Type
RequisitePro uses the VARCHAR2 data type to store searchable text for requirement text, revision history reasons, and textual attribute values.
Although Oracle7 supports a maximum of 2,000 characters in the VARCHAR2 data type, Oracle8 supports up to 4,000, allowing you to expand the constraints on the size of the searchable text from 2,000 to 4,000 characters.
The RequisitePro Oracle scripts set the limit on this data type to 2000 characters to accommodate both Oracle7 and Oracle8 databases. To modify this limit for Oracle8 databases, increase the MAX_VARCHAR value in the CREATE_REQPRO script from 2000 to a maximum of 4000.
Creating a Schema
The Oracle database administrator performs the following procedure to create a RequisitePro schema in Oracle:
- Edit the CREATE_REQPRO script, as described above in the section Editing Scripts on page19Editing Scripts.
- On the Oracle database server, log on to SQL*Plus with system administrator permissions.
Note: If you run SQL*Plus from a remote client, you need to edit the RequisitePro CREATE_USER script. Change the entry connect &3/&4 to the following:
connect &3/&4@<target Oracle database server alias> - Run the CREATE_REQPRO script using the command:
@<setup directory>\CREATE_REQPRO
This script runs the schema creation scripts. A message appears upon successful completion of the schema creation. If errors occur or the completion message does not appear, review the log CREATE_REQPRO.LOG.
User ID for Accessing Oracle Database
All RequisitePro projects should access the Oracle database using the same user ID, which was created during the schema creation process, described above. The initial user name and password created by the script are "reqpro" and "reqpro", unless you modified the CREATE_REQPRO script, as described in Editing Scripts. You can also change the password using your Oracle database utilities.
Each user does not need a separate Oracle account because RequisitePro uses its own user and user group tables to control access to a project.
Using Multiple Projects within an Oracle Database
RequisitePro supports multiple projects within a single Oracle schema. Refer to the procedure Creating a Project in Oracle for instructions on adding an Oracle database project within RequisitePro. Use the same schema name for each of your RequisitePro projects.
Connecting Projects Across Databases
Perform the following steps to enable cross-project traceability between projects in distributed Oracle databases. Refer to the following sections for details.
- Creating a reference to the remote database instance
- Creating a database link to the remote database
- Defining database aliases on each RequisitePro client
Creating a reference to the remote database instance
In order to run traceability queries between projects in distributed Oracle databases, you need to define a reference in each database instance that refers to the remote database instances. Edit the tnsnames.ora file, located on the Oracle server, to define the name, host, port, and protocol of the remote service.
The following example shows the syntax for defining the database instance "server02" as a remote database server to "server01" in the tnsnames.ora file:
Server02.world =
  (DESCRIPTION =
    (ADDRESS_LIST =
      (ADDRESS =
          (COMMUNITY = tcp.world)
          (PROTOCOL = TCP)
          (Host = server02)
          (Port = 1521)))
    (CONNECT_DATA = (SID = ORCL)))
In similar fashion, the "server02" database instance needs an entry to define the remote "server01" database instance:
Server01.world =
  (DESCRIPTION =
    (ADDRESS_LIST =
      (ADDRESS =
          (COMMUNITY = tcp.world)
          (PROTOCOL = TCP)
          (Host = server01)
          (Port = 1521)))
    (CONNECT_DATA = (SID = ORCL)))
Note: This feature was tested using TNSNAMES for service name resolution. Use of Oracle Names Server or any other name server mechanism requires a different setup.
Creating a database link to the remote database
Next, create a database link to each remote database in each database instance using a SQL utility. The link should be defined under the user account that owns the RequisitePro schema. The following example shows the required syntax for linking to "server02" from "server01":
CREATE DATABASE LINK server02.world CONNECT TO reqpro IDENTIFIED BY reqpro USING `server02.world';A similar statement should be executed on the server02 database instance in order to define a link to server01.
If the db_name.db_domain does not result in a unique name for each database for which a link is required, use the @connection_qualifier syntax to create a unique name.
This naming convention will work regardless of the setting of the global_names parameter in the initorcl.ora file.
Defining database aliases on each RequisitePro client
Define SQL*Net database aliases or Net8 service names (resulting in local tnsnames.ora file entries) on each RequisitePro client machine (or shared centrally on a network) for each database instance. The database alias or service name on the client MUST match the database link you defined in the previous step for RequisitePro cross-project traceability to function correctly.
For more information on configuring client PCs for use with a Rational RequisitePro Oracle database, refer to the following section.
Setting Up PCs for Oracle Access
Use the Oracle SQL*Net or Net8 Easy Configuration tool to configure access from your client PC to the Oracle database server. If you plan to share projects with other users, be sure to use a consistent database alias or service name, as determined by your database administrator.
Creating a Project in Oracle
Note: To convert a project from an existing Microsoft Access database to an Oracle database, use the Database Type Conversion Wizard. Open the Database Type Conversion Wizard in Windows Explorer. The executable, rqdatatransportwiz.exe, is located in the directory: \Program Files\Rational\RequisitePro\bin\
Perform the following steps to create a RequisitePro project that uses the Oracle database server for storing the RequisitePro project database.
In order for you to configure your access to Oracle from RequisitePro, the database administrator must provide the following information:
q Oracle database server name (TCP/IP Host Name)q Oracle database alias or service name
q Oracle schema name for storing RequisitePro projects (see procedure below)
q your user ID for logging on to the Oracle database
q your user password for logging on to the Oracle database
- In RequisitePro on the Project menu, click New. The Create RequisitePro Project dialog box appears.
- Select a project template.
Note: The details in the lower part of the dialog box provide an explanation as you select each template.
- Click Create. The Rational RequisitePro Project Properties dialog box appears.
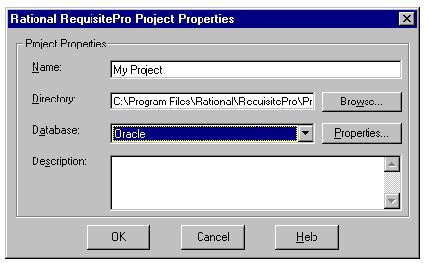
- Enter a project name and directory location.
- At the Database field, select Oracle from the drop-down list and click the Properties button. The Database Properties dialog box appears.
- Click the Configure button. The Microsoft ODBC for Oracle Setup dialog box appears.

- Do not modify the default entries in the Data Source Name and Description fields.
- Type your User Name for logging into the Oracle database, as provided by your Oracle database administrator. By default, the user name is "reqpro".
- For the Server field, type the alias or service name you entered when configuring your PC for access to the Oracle database.
Note: This database alias or service name must be identical when configuring all PCs that will access shared RequisitePro projects in the Oracle database.
- Click OK. The Database Properties dialog box appears.
- Click the Account Info button. The Database Account Info dialog box appears.
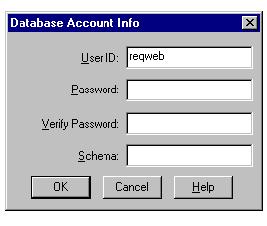
- Do not modify the User ID field. This should match the user name you entered in the previous dialog box.
- Type your user password for logging into the Oracle server. This should be supplied to you by your Oracle database administrator.
- Retype your password in the Verify Password field.
- In the Schema field, type the name of the Oracle schema that your Oracle database administrator has established for storing RequisitePro data in Oracle.
- Click OK to close the Database Account Info dialog box. Click OK to close the Database Properties dialog.
- Finish creating your project, then click OK to close the Project dialog box.
Archiving and Baselining an Oracle Project
Refer to the topics "Archiving enterprise database projects" and "Baselining projects with Unified Change Management" in the RequisitePro online help. These help topics are also available in Let's Go RequisitePro. Click the Project Administration Tips icon and select the appropriate link.