
Printer-friendly version. Use your browser's Print command to print this version.
This tutorial is intended for Host On-Demand
administrators who want to learn about one or more of the following:
This tutorial includes a real-life example of how to create a custom HTML template
which modifies a Host On-Demand desktop page. The modifications include:
To benefit from this tutorial you should already know:
Host On-Demand Versions 7.0 and 8.0 support Custom HTML Templates.
The Host On-Demand desktop page is the HTML page that displays the Host On-Demand desktop with its session icons.
Shown below is the default Host On-Demand desktop page with its light-gray textured background, with the IBM WebSphere Host On-Demand banner at the top, and with the centrally located Host On-Demand desktop window containing the icons of configured sessions.

There are at least two reasons why you
might want to modify the Host On-Demand desktop page:
Before custom HTML templates were available,
the steps required to modify a Host On-Demand desktop page were as follows:
This method was satisfactory in most respects but had a big disadvantage: if you needed to run the Deployment Wizard again in order to modify your Host On-Demand desktop page, for example in order to add an additional 3270 session, then the customized changes that you had made to the main HTML file were lost.
Specifically, the Deployment Wizard would create a new main HTML file that would not contain your customizations. You would have to manually edit the new main HTML file in order to add your customizations, just as you did the first time.
In contrast, with a custom HTML template
file the steps required to modify a Host On-Demand desktop page are:
Because the customizations are kept
in a separate file, they are not lost when you run the Deployment Wizard. If
you need to run the Deployment Wizard again in order to make a change such as
adding an additional session, then the Deployment Wizard will create new output
files which include the customizations specified in the custom HTML template
file.
You can use a custom HTML template file with virtually any Deployment Wizard configuration, including the following:
In this section you have a choice between going on to read about the step-by-step creation of a real-life custom HTML template file, or stopping for a while to learn about some advanced topics.
Note: Although you do not need to read the advanced topics in order to follow the main thread of this tutorial, you should understand these topics before you begin making real life changes in your Host On-Demand installation.
Click Next to go on to view the step-by-step creation of a custom HTML template file.
Or to read one of the advanced topics, click on a topic below that you are interested in.
This topic describes two of the files
that are created when you run the Deployment Wizard:
As you probably know, the Deployment Wizard creates not just one output file but several. The number and nature of these files depends on the settings that you choose as you go through the Deployment Wizard. For the purposes of working with custom HTML template files you need to be aware of two of these files.
The first file, which we will call the
main HTML output file, is the primary output file created by the Deployment Wizard.
This is the file whose name you specify in the File Name field of the last page
of the Deployment Wizard, when you are ready to click Create File(s) and create
all the Deployment Wizard output files. This is also the file:
The second file, which for want of a better term we will call the proximate HTML output file, is the file which contains the HTML elements and JavaScript statements that directly generate the Host On-Demand desktop page. This is also the file into which the Deployment Wizard copies the HTML and JavaScript elements that you have placed in a custom HTML template file. Therefore, this is the file in which you should look if you are trying to debug a problem with elements in a custom HTML template file.
You can identify the main HTML output file easily because it is the file that you specify in the Deployment Wizard. In this tutorial the main HTML output file is StandardSupplies.html.
The proximate HTML output file is also easy to identify. If you specify a Host On-Demand Java Level of Java 1 on the Additional Options page of the Deployment Wizard, then the main HTML output file is also the proximate HTML output file. In this tutorial the Host On-Demand Java Level is Java 1, so StandardSupplies.html is both the main HTML output file and the proximate HTML output file.
On the other hand, if you have specified a Host On-Demand Java Level of Java 2 or of Auto Detect, then the Deployment Wizard creates a separate proximate HTML output file, whose name is formed by adding the two characters "z_" to the beginning of the main HTML output file name. If this tutorial used a Host On-Demand Java Level of Java 2 or of Auto Detect, then there would be a separate proximate HTML output file named z_StandardSupplies.html. The main HTML output file would still be named StandardSupplies.html.
The file Wizard.html is essential to the proper operation of the Deployment Wizard. When a custom HTML template file is not specified (this is the normal case), the Deployment Wizard uses the information in Wizard.html as a default template for building the proximate HTML output file. If Wizard.html became corrupted, then the Deployment Wizard might refuse to create output files, or might create output files that did not work properly.
Wizard.html serves a second purpose: it is the file that contains the information that you need in order to create a custom HTML template file.
However, since Wizard.html is so important
to the operation of Deployment Wizard, do not edit Wizard.html directly. Instead,
There are a few situations in which you might want to modify Wizard.html. For example, if you wanted to add the same particular set of HTML elements or JavaScript items to every web page that you created using the Deployment Wizard, then you could add those changes to Wizard.html itself. Then you would not have to specify a custom HTML template file each time you created a new web page in the Deployment Wizard. However, even in this situation, in terms of file management, you are probably better off making the changes in a custom HTML template file rather than in Wizard.html. In any case, if you do modify Wizard.html, remember to make a backup copy first so that you can restore it to its original state if necessary!
Your custom HTML template file must be in UTF-8 format. UTF-8 is a standard format for storing Unicode characters. Wizard.html itself is in UTF-8 format. UTF-8 uses a unique sequence of 1, 2, 3, or 4 bytes to encode each character in the Unicode character set. UTF-8 handles all the Unicode characters, including all the characters of the double-byte-character set languages.
The Notepad editor included with Microsoft Windows 2000 and with Microsoft Windows XP is UTF-8 capable (but the Notepad editor included with Windows NT is not). When Notepads Save As dialog appears, expand the Encoding listbox and select UTF-8.
If the UTF-8 formatting of a custom HTML template file becomes corrupted, then the Deployment Editor will refuse to process the file.
You can get by with using an ASCII-only editor to edit your custom HTML template files if you use only characters in the lower-127-character range of the ASCII table. This range includes English lowercase and uppercase letters, numerals, and many punctuation symbols. This approach works because for these characters UTF-8 uses the same 1-byte encodings as ASCII does. But if you use any character in the upper-129-character range of the ASCII table (these are 1-byte ASCII characters that UTF-8 uses 2 or more bytes to encode), then the Deployment Wizard may not be able to process the custom HTML template file or may process it differently than you expect.
Given the risk of your accidentally introducing a character in the upper-129-character ASCII range, you should not use an ASCII-only editor. Instead use a UTF-8 capable editor.
If do you use an ASCII-only editor to view a UTF-8 formatted file such as Wizard.html you will see the 3 characters  at the beginning of the file listing. These are the ASCII representation of a three-byte signature indicating to a UTF-8-capable editor that the file is in UTF-8 format. Do not delete these characters! These characters do not appear when you edit a custom HTML template file with a UTF-8-capable editor such as Notepad.
You do not have to set up a computer system in order to follow along online with this tutorial. All the Host On-Demand screens that would be generated by the examples in this tutorial are shown as part of the tutorial itself.
However, you may wish to know how the
computer system used in creating the examples used in this tutorial was configured:
The system was set up as follows:
The Host On-Demand server was set up
as follows:
The same system was used for all three
of the program functions used in this tutorial:
To run the browser as a Host On-Demand client on the Host On-Demand server itself, start the Internet Explorer and enter a URL according to the following pattern:
http://localhost/hod/myfile.html
where
In this tutorial, the main HTML output file is standardsupplies.html, so the URL would be:
http://localhost/hod/standardsupplies.html
You will probably want to make your changes directly to the Custom HTML template file as we have done in this tutorial.
If you have a long series of changes, you might want to add one change at a time to the Custom HTML template file, testing the results after each change.
As a shortcut during development, you can run the template file itself in the browser to see the results, rather than regenerate the Deployment Wizard output files. For example, in this tutorial, we could run sstemplate.html in the browser to see the results. When you have completed and tested all the changes, then regenerate the Deployment Wizard output files.
Another approach is to make the changes directly to the proximate output file. Test each change separately by running the proximate HTML output file in a browser. When you are satisfied that the change works as you had intended, move the change from the proximate HTML output file to your custom HTML template file, and regenerate your Deployment Wizard output files. Then go on to make and test the next change.
Remember to keep backup copies!
In this scenario we will create a real-life custom HTML template file for a hypothetical company named Standard Supplies, Inc.
We will assume that we are running Host On-Demand Version 8.0 Service Manager on a Windows 2000 system, and that we are running the Deployment Wizard on the same system. Also we will assume that to run the Host On-Demand client we are using Microsoft Internet Explorer on a Windows 2000 system.
Visit the Advanced Topics to learn more about how the computer system used to create these example screens was configured.
|
|
|
|
|
|
Start the Deployment Wizard, then use
the following settings to create Deployment Wizard files for a default Host On-Demand
desktop page for Standard Supplies, Inc.
Note: Do not put a space between "Standard" and "Supplies", but write
the file name as one word.
Browse StandardSupplies.html as a Host On-Demand client.
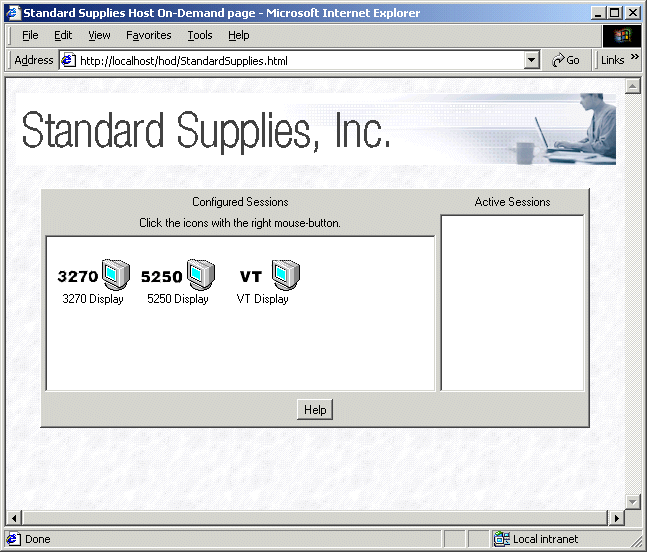
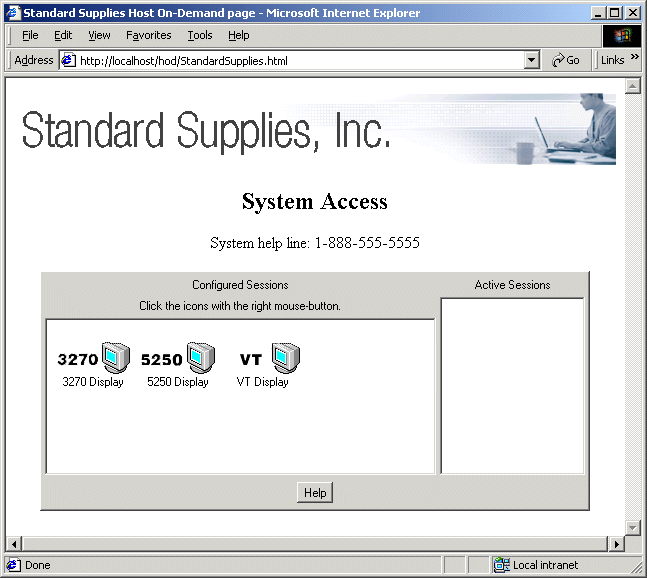
The resulting Host On-Demand desktop page is shown below. This is the default Host On-Demand desktop page.
Note: Do not delete or
change Wizard.html!
To learn more about Wizard.html visit
the Advanced Topics.
cd c:\Program Files\IBM\HostOnDemand\HOD
copy Wizard.html CustomTemplate.html
cd c:\Program Files\IBM\HostOnDemand\HOD
copy CustomTemplate.html sstemplate.html
Use the Deployment Wizard to edit StandardSupplies.html.
The Other tab of the Advanced Options panel is shown below.

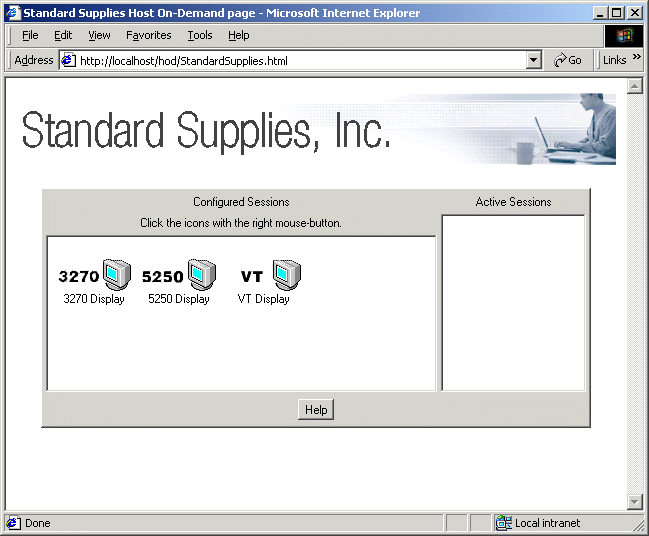
Use the browser to run StandardSupplies.html as a Host On-Demand client. You should again see the default Host On-Demand desktop page, exactly as it appeared in Step 1 above.
The reason that the Host On-Demand desktop page has not changed in appearance is that we are using a default custom HTML template file which has not been modified.
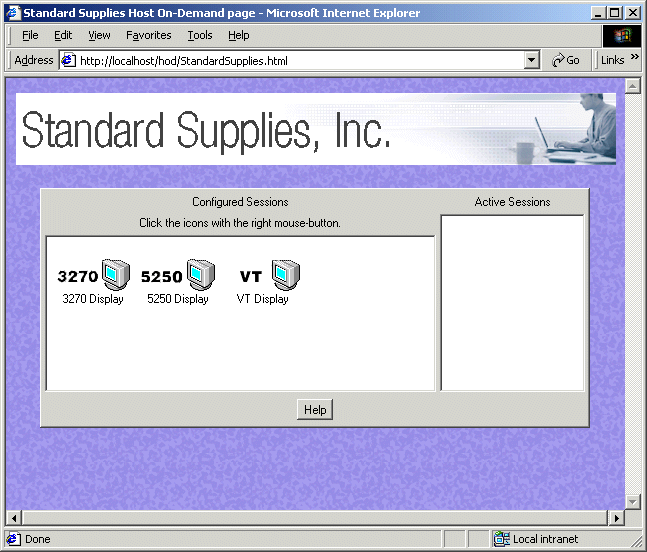
This preparatory step does not require a custom HTML template. The purpose of this step is to make the rest of the Host On-Demand desktop page easier to see by reducing the size of the sessions window.
Use the Deployment Wizard to edit StandardSupplies.html.
Use the browser to run StandardSupplies.html as a Host On-Demand client. The resulting default Host On-Demand desktop page is shown below. Notice that the sessions window is smaller than it was in Step 4.

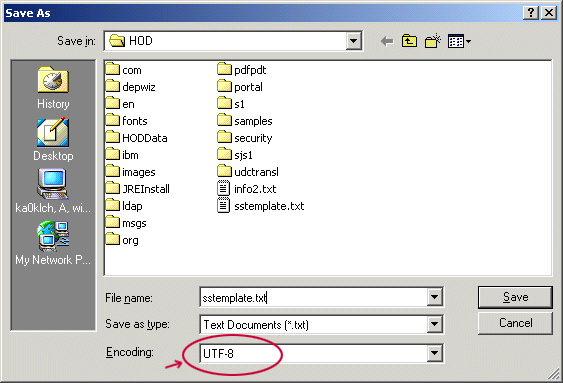
Custom HTML template files must be in UTF-8 format. The Notepad editor included with Microsoft Windows 2000 and with Windows XP is UTF-8 capable. The Notepad editor included with Windows NT is not!
To save a file in UTF-8 format with
Notepad
Visit the Advanced Topics to learn more about UTF-8
format. Shown below is Notepad's Save As message box with the UTF-8 format selected.
Note: Do not change any parts of a custom HTML template file other than the sections that are identified in this step as valid to change. Changing other parts of this file may make it unusable by Deployment Wizard.
Also, do not change any of the HTML comments
that occur in the default custom HTML template file, including the following:
The contents of a default custom HTML template file are shown below.
<!doctype html public "-//W3C//DTD HTML 3.2 Final//EN"> <!-- SCRIPTS -->
<HTML>
<HEAD>
<META http-equiv="content-type" content="text/html; charset=UTF-8">
<!-- SUMMARY -->
</HEAD>
<BODY BACKGROUND="<DW_CODE_BASE>hodbkgnd.gif">
<CENTER>
<IMG src="<DW_CODE_BASE>hodlogo.gif" ALT="hodlogo.gif">
<P>
<!-- STARTAPPLETPARMS
-->
<!-- ENDAPPLETPARMS -->
<!-- APPLET -->
</CENTER>
</BODY>
</HTML>
The three sections of this file in which changes are valid are:
Again, the contents of a default custom HTML template file are shown below.
Be aware that this file contains a CENTER element. It begins with a <CENTER> tag just after the <BODY> tag and ends with a </CENTER> tag just before the </BODY> tag. These two tags are shown below in bold.
As you probably know, every HTML element that has visual output and that occurs within a CENTER element will have its visual output centered horizontally across the HTML page when the page is browsed. For example, in the default Host On-Demand desktop shown in Step 5, the Host On-Demand banner is centered horizontally across the HTML page.
If you do not want certain HTML elements centered horizontally, you can delete the CENTER element. You can also add CENTER elements elsewhere, so long as you modify only sections of the file that are identified in Step 7 as valid to change.
!doctype html public "-//W3C//DTD HTML 3.2 Final//EN"> <BODY BACKGROUND="<DW_CODE_BASE>hodbkgnd.gif"> <!-- STARTAPPLETPARMS
--> <!-- SCRIPTS --> </CENTER>
<HTML>
<HEAD>
<META http-equiv="content-type" content="text/html; charset=UTF-8">
<!-- SUMMARY -->
</HEAD
<CENTER>
<IMG src="<DW_CODE_BASE>hodlogo.gif" ALT="hodlogo.gif">
<P>
<!-- ENDAPPLETPARMS -->
<!-- APPLET -->
</BODY>
</HTML>
After you make changes to a custom HTML template file, you must regenerate the Deployment Wizard file that references the custom HTML template file in order to incorporate the changes.
In this tutorial the custom HTML template file is sstemplate.html and the Deployment Wizard file that references it is StandardSupplies.html. When we modify sstemplate.html, we must regenerate StandardSupplies.html in order to pick up the changes that were made to sstemplate.html. (The Deployment wizard also generates several other related output files along with StandardSupplies.html, whether or not there is a custom HTML template file present.)
To regenerate the Deployment Wizard
files:
In this step we replace the WebSphere Host On-Demand banner at the top of the page with the banner of Standard Supplies, Inc.
The resulting web page is shown below. At the top of the page is the banner for Standard Supplies, Inc.
<BODY BACKGROUND="<DW_CODE_BASE>hodbkgnd.gif">
<CENTER>
<IMG id="topholder" src="<DW_CODE_BASE>sslogo.gif"
ALT="sslogo.gif">
<P>
<!-- STARTAPPLETPARMS
-->
<!-- ENDAPPLETPARMS -->
<!-- SCRIPTS -->
<!-- APPLET -->
</CENTER>
</BODY>
</HTML>
In this section we discard the light-gray
textured background pattern of the default Host On-Demand desktop page in favor
of a plain white background that will blend better with our banner. Here are the
steps:
<BODY>
View the modified custom HTML template file.
The resulting web page is shown below.
Just for fun, you can view two other ways in which we could change the background.
Here is the web page with our new white background.
<!doctype html public
"-//W3C//DTD HTML 3.2 Final//EN">
<HTML>
<HEAD>
<META http-equiv="content-type" content="text/html; charset=UTF-8">
<!-- SUMMARY -->
</HEAD>
<BODY>
<CENTER>
<IMG id="topholder" src="<DW_CODE_BASE>sslogo.gif"
ALT="sslogo.gif">
<P>
<!-- STARTAPPLETPARMS
-->
<!-- ENDAPPLETPARMS -->
<!-- SCRIPTS -->
<!-- APPLET -->
</CENTER>
</BODY>
</HTML>
<BODY BACKGROUND="<DW_CODE_BASE>ssbg1.gif">
<BODY bgcolor="silver" >

In this step we add some meaningful
text above the sessions window.
<h2>System Access</h2>
System help line: 1-888-555-5555<br>
<p>
View the modified custom HTML template file.
The resulting web page is shown below. We have added a caption "System Access" and a phone number for help.
<BODY>
<CENTER>
<IMG id="topholder" src="<DW_CODE_BASE>sslogo.gif"
ALT="sslogo.gif">
<P>
<h2>System Access</h2>
System help line: 1-888-555-5555<br>
<p>
<!-- STARTAPPLETPARMS
-->
<!-- ENDAPPLETPARMS -->
<!-- SCRIPTS -->
<!-- APPLET -->
</CENTER>
</BODY>
</HTML>
In this step we add a set of four
hyperlinks near the top of the web page. To make these links more attractive
we arrange them in a table and use a different image for each link.
We also add a caption, "Internal Links".
<p>
<h2>Internal Links</h2>
<table>
<tr><td>
<a name="aerogif" href="#aerolinks"><img src="aero.gif"
Border="0"></a>
</td><td>
<a name="autogif" href="#autolinks"><img src="auto.gif"
Border="0"></a>
</td><td>
<a name="chemgif" href="#chemlinks"><img src="chem.gif"
Border="0"></a>
</td><td>
<a name="elecgif" href="#eleclinks"><img src="elec.gif"
Border="0"></a>
</td></tr>
</table>
The link references that we have specified, such as href="#aerolinks", href="#autolinks",
and so on, refer to destinations that do not exist. That is, the identifiers
"aerolinks", "autolinks", "chemlinks", and "eleclinks" are not valid link
references in the current page.
In an actual implementation, we would specify actually existing link references.
View the modified custom HTML template file.
copy aero.gif c:\Program Files\IBM\HostOnDemand\HOD
copy auto.gif c:\Program Files\IBM\HostOnDemand\HOD
copy chem.gif c:\Program Files\IBM\HostOnDemand\HOD
copy elec.gif c:\Program Files\IBM\HostOnDemand\HOD
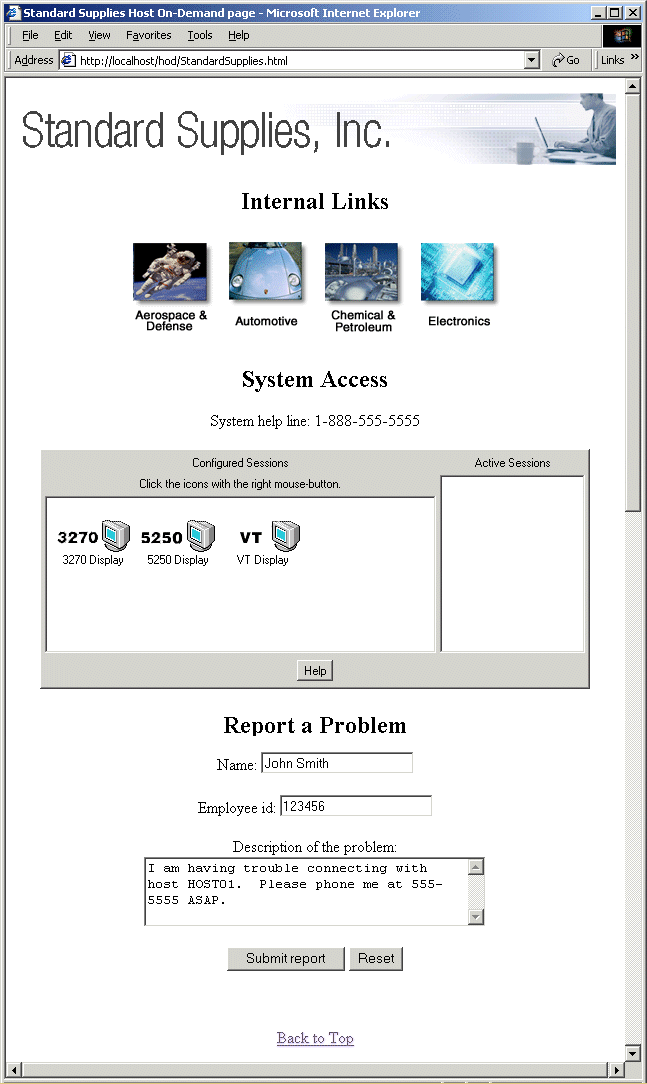
The resulting web page is shown below. If we had specified actually existing link references, clicking on each image would have caused the browser to jump to the associated link reference.

<BODY>
<CENTER>
<IMG id="topholder" src="<DW_CODE_BASE>sslogo.gif"
ALT="sslogo.gif">
<p>
<h2>Internal Links</h2>
<table>
<tr><td>
<a name="aerogif" href="#aerolinks"><img src="aero.gif"
Border="0"></a>
</td><td>
<a name="autogif" href="#autolinks"><img src="auto.gif"
Border="0"></a>
</td><td>
<a name="chemgif" href="#chemlinks"><img src="chem.gif"
Border="0"></a>
</td><td>
<a name="elecgif" href="#eleclinks"><img src="elec.gif"
Border="0"></a>
</td></tr>
</table>
<p>
<h2>System Access</h2>
System help line: 1-888-555-5555<br>
<p>
<!-- STARTAPPLETPARMS
-->
<!-- ENDAPPLETPARMS -->
<!-- SCRIPTS -->
<!-- APPLET -->
</CENTER>
</BODY>
</HTML>
In this step we add a simple problem report form to the bottom of the page.
The resulting web page is shown below.
When the submit button is pressed the browser jumps to report.html.
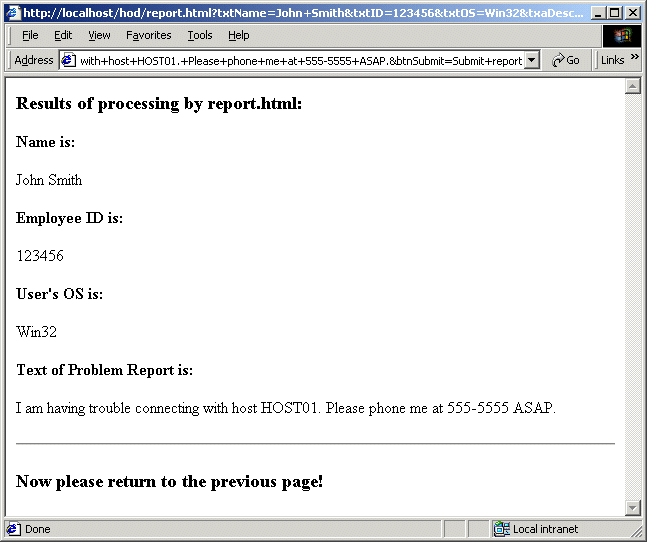
View the page generated by report.html.
var strInput = window.location.search.substring(1)
document.write( "<h3> Results of processing by report.html: </h3>"
) ;
<!-- document.write( strInput + "<br>") ; -->
if ( ( strInput != null )
&& ( strInput.length > 1 ) )
{
<!-- Split the arguments apart from each other -->
astrParms = strInput.split( '&' ) ;
<!-- Process name -->
astrItems = astrParms[ 0 ].split( '=' ) ;
strValue = astrItems[ 1 ] ;
strValue = strValue.replace( '+', " " ) ;
document.write( "<h4>Name is: </h4>" ) ;
if ( strValue.length== 0 )
{
document.write( "Missing!" );
}
else
{
document.write( strValue ) ;
}
<!-- Process employee
id -->
astrItems = astrParms[ 1 ].split( '=' ) ;
strValue = astrItems[ 1 ] ;
strValue = strValue.replace( '+', " " ) ;
document.write( "<h4>Employee ID is: </h4>" ) ;
if ( strValue.length== 0 )
{
document.write( "Missing!" );
}
else
{
document.write( strValue ) ;
}
<!-- Process os -->
astrItems = astrParms[ 2 ].split( '=' ) ;
strValue = replaceChars( astrItems[ 1 ] ) ;
document.write( "<h4>User's OS is: </h4>" ) ;
document.write( strValue ) ;
<!-- Process report -->
astrItems = astrParms[ 3 ].split( '=' ) ;
strValue = replaceChars( astrItems[ 1 ] ) ;
document.write( "<h4>Text of Problem Report is: </h4>"
) ;
if ( strValue.length <= 0 )
{
document.write( "Missing!" );
}
else
{
document.write( strValue ) ;
}
}
else
{
document.write( "Input string was empty!" ) ;
}
document.write( "<br><br><hr>"
) ;
document.write( "<h3> Now please return to the previous page! </h3>"
) ;
function replaceChars( strInput
)
{
var strTmp = strInput ;
strTmp = replaceCh( strTmp, "+" ) ;
strTmp = replaceCh( strTmp, "%0D" );
strTmp = replaceCh( strTmp, "%0A" );
return strTmp ;
}
function replaceCh( strInput,
strChar )
{
var i;
var strTmp = strInput ;
for ( i = 0; i < 1024;
i++ )
{
if ( strTmp.indexOf(
strChar ) != -1 )
{
strTmp = strTmp.replace( strChar, " " ) ;
}
else
{
break;
}
}
return strTmp ;
}
</SCRIPT>
<BODY>
<CENTER>
<IMG id="topholder" src="<DW_CODE_BASE>sslogo.gif"
ALT="sslogo.gif">
<p>
<h2>Internal Links</h2>
<table>
<tr><td>
<a name="aerogif" href="#aerolinks"><img src="aero.gif"
Border="0"></a>
</td><td>
<a name="autogif" href="#autolinks"><img src="auto.gif"
Border="0"></a>
</td><td>
<a name="chemgif" href="#chemlinks"><img src="chem.gif"
Border="0"></a>
</td><td>
<a name="elecgif" href="#eleclinks"><img src="elec.gif"
Border="0"></a>
</td></tr>
</table>
<p>
<h2>System Access</h2>
System help line: 1-888-555-5555<br>
<p>
<!-- STARTAPPLETPARMS
-->
<!-- ENDAPPLETPARMS -->
<!-- SCRIPTS -->
<!-- APPLET -->
<br>
<br>
<h2 id=problem> Report a Problem </h2>
<FORM id=fmReport method="get" action="report.html" >
Name: <input type="text" name=txtName ><br><br>
Employee id: <input type="text" name=txtID ><br><br>
<input type="hidden" name="txtOS" >
Description of the problem:<br>
<textarea name=txaDesc rows=4 cols=40></TEXTAREA><BR><BR>
<input type="submit" name="btnSubmit" value="Submit
report">
<input type="reset" name=btnReset>
</FORM>
<br>
<br>
<a href="#topholder">Back to Top</a>
</CENTER>
</BODY>
</HTML>

In this step we add a JavaScript function
to do some processing on the form before it is submitted. This JavaScript function
reads from the system a string identifying the platform ("Win32") and writes it
into a hidden field of the form.
<input type="submit"
name="btnSubmit" onfocus=setValues() value="Submit report">
This change will cause the new JavaScript function setValues() to be called
when the submit button receives the input focus.
<SCRIPT LANGUAGE="JavaScript">
function setValues()
{
var ael = fmReport.elements ;
var os = ael[ 2 ] ;
os.value = navigator.platform ;
}
</SCRIPT>
Function setValues() contains 3 lines. Let us look at it line by line.
fmReport is the name that we have assigned to the form.
fmReport.elements returns an array of objects corresponding to the input
elements in fmReport. We store this array into the variable ael.
There are 6 input objects in ael:
-- txtName is the object for the Name input field.
-- txtID is the object for the Employee ID field.
-- txtOS is the hidden field.
-- txtaDesc is the problem description.
-- btnSubmit is the submit button.
-- btnReset is the reset button.
In this line we take the third object, which corresponds to the hidden
field named txtOS, and store the object into the variable os.
navigator.platform returns the platform information as a string. Here
the string would be "Win32". We store this string into os.value. This
is like writing the string "Win32" into the hidden field txtOS.
View the modified custom HTML template file.
The resulting web page is shown below. The page looks the same as it did in Step 14, because we have not added any new visible content. However, when the submit button receives input focus, the JavaScript function setValues() reads the platform information string ("Win32") and writes it into the hidden field. When the submit button is clicked, the contents of the hidden field are submitted along with the contents of the other input fields.
The contents of report.html are the same as in Step 14.
View the page generated by report.html. Notice that the string "Win32" is now displayed for the Platform Information.
|
|
|
<BODY>
<CENTER>
<IMG id="topholder" src="<DW_CODE_BASE>sslogo.gif"
ALT="sslogo.gif">
<p>
<h2>Internal Links</h2>
<table>
<tr><td>
<a name="aerogif" href="#aerolinks"><img src="aero.gif"
Border="0"></a>
</td><td>
<a name="autogif" href="#autolinks"><img src="auto.gif"
Border="0"></a>
</td><td>
<a name="chemgif" href="#chemlinks"><img src="chem.gif"
Border="0"></a>
</td><td>
<a name="elecgif" href="#eleclinks"><img src="elec.gif"
Border="0"></a>
</td></tr>
</table>
<p>
<h2>System Access</h2>
System help line: 1-888-555-5555<br>
<p>
<!-- STARTAPPLETPARMS
-->
<!-- ENDAPPLETPARMS -->
<!-- SCRIPTS -->
<!-- APPLET -->
<br>
<br>
<h2 id=problem> Report a Problem </h2>
<FORM id=fmReport method="get" action="report.html" >
Name: <input type="text" name=txtName ><br><br>
Employee id: <input type="text" name=txtID ><br><br>
<input type="hidden" name="txtOS" >
Description of the problem:<br>
<textarea name=txaDesc rows=4 cols=40></TEXTAREA><BR><BR>
<input type="submit" name="btnSubmit" onfocus=setValues()
value="Submit report">
<input type="reset" name=btnReset>
</FORM>
<br>
<br>
<a href="#topholder">Back to Top</a>
<SCRIPT LANGUAGE="JavaScript">
function setValues()
{
var ael = fmReport.elements ;
var os = ael[ 2 ] ;
os.value = navigator.platform ;
}
</SCRIPT>
</CENTER>
</BODY>
</HTML>
Session parameters are HTML parameters that are passed to the Host On-Demand applet and that affect its behavior in specific ways. You can learn more about the various types of session parameters in the Host On-Demand online documentation.
To add a session parameter to a custom HTML template file, place the parameter between the <!-- STARTAPPLETPARMS --> comment line and the <!-- ENDAPPLETPARMS --> comment line. Do not put any statements between these two lines other than session parameters.
In specifying a session parameter use the format <PARAM=name VALUE=value>. The following example shows a Disable session parameter and a IgnoreWellKnownTrustedCAs parameter.
<!-- STARTAPPLETPARMS
-->
<PARAM NAME="Disable" VALUE="cutpaste;filexfer3270;filexfer5250">
<PARAM NAME="IgnoreWellKnownTrustedCAs" VALUE="true">
<!-- ENDAPPLETPARMS -->
|
|
|
In this tutorial we have covered the
following topics:
We have used a custom HTML template to add the following information to a
Host On-Demand desktop page: