Class Diagrams and Specifications
Contents
- Class Diagram Overview
- Class Specification
- Class Attribute Specification
- Operation Specification
- Parameter Specification
- Association SpecificationGeneralize Specification
- Realize Specification
- Dependency Specification
- Has Relationship (Booch Only)
- Key/Qualifier Specification
Class Diagram OverviewA class diagram is a picture for describing generic descriptions of possible systems. Class diagrams and collaboration diagrams are alternate representations of object models. Class diagrams contain classes and object diagrams contain objects, but it is possible to mix classes and objects when dealing with various kinds of metadata, so the separation is not rigid.
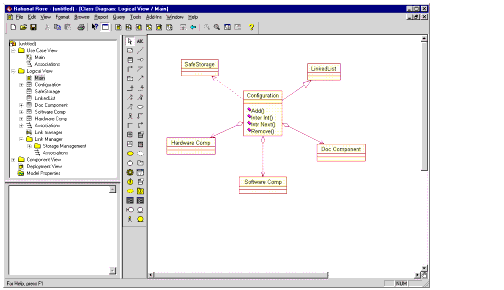
Figure 16 Class Diagram Example
Class diagrams contain icons representing classes, interfaces, and their relationships. You can create one or more class diagrams to depict the classes at the top level of the current model. Such class diagrams are themselves contained by the top level of the current model. You can also create one or more class diagrams to depict classes contained by each package in your model. Such class diagrams are themselves contained by the package enclosing the classes they depict. The icons represent logical packages and classes in class diagrams.
You can change properties or relationships by editing the specification or modifying the icon in the diagram. The associated diagrams or specifications are automatically updated.
Class Diagram Toolbox
The graphic below shows all the tools that can be placed on the class diagram toolbox. See Customizing the Toolbox for more information about adding or deleting tools in a diagram toolbox.
The application window displays the following toolbox when the current window contains a class diagram, you have selected View > As Unified, and you have customized the toolbox to display all the tool options.
Figure 17 Class Diagram Toolbox
Creating and Displaying a Class Diagram
You can create or display a class diagram in one of three ways:
- Click Browse > Class Diagram.
- On the toolbar, click the class diagram icon.
- On the browser, double-click the class diagram icon.
Assigning a Class to Another Logical Package
Every class is assigned to a logical package. When you create a class using a creation tool from the class diagram toolbox, the class is assigned to the logical package containing the class diagram. For example, a class diagram named Main is directly contained by the logical package named LinkManager. All of the classes depicted on Main are assigned to LinkManager, except the class SafeStorage. This is assigned to logical package StorageManagement. Rational Rose annotates the icon representing SafeStorage with the phrase from Storage Management.
To re-assign a class from one logical package to another:
- 1 Select an icon (or icons) representing the class in a diagram contained by the logical package to which the class should be assigned. (You might need to create such a diagram or icon if one does not currently exist.)
- 2 Click Edit > Relocate.
Adding and Hiding Classes and Filtering Class Relationships
The commands on the Query menu allow you to control which model elements are represented by icons in the current diagram.
- Add Classes adds classes to the diagram by name.
- Add Use Cases adds use cases to the diagram by name.
- Expand Selected Elements adds classes to the diagram based on their relationships to selected classes.
- Hide Selected Elements removes selected classes from the diagram and optionally removes their clients or suppliers from the diagram.
- Filter Relationships controls which kinds of relationships appear in the diagram.
Class SpecificationA Class Specification displays and modifies class properties and relationships. Some of the information in the specification can also be displayed inside class icons.
If a field does not apply to a particular class type, the field is unavailable and you cannot add or change information in the field.
To display a Class Specification, click an icon representing the class in a class diagram and click Browse > Specification.
If you have not clicked Tools > Options and selected the Double-Click to diagram check box, you can double-click any icon representing the class. You can also click Specification from the shortcut menu.
Specification Content
The Class Specification consists of the following tabs: General, Detail, Operations, Attributes, Relations, Component, Nested, and Files.
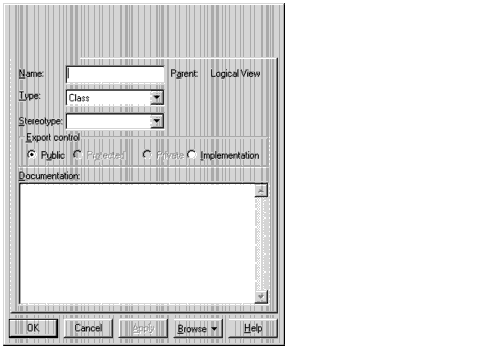
Class Specification--General Tab
Figure 18 Class Specification--General Tab
Refer to the descriptions in the Introduction to Specifications chapter for information on the specification elements not covered in the following section.
Type
Your Type choices include: Class, Parameterized Class, Instantiated Class, Class Utility, Parameterized Class Utility, Instantiated Class Utility, and Metaclass.
Parent
The parent to which the class belongs (its package) is displayed in this static field.
Stereotype
A stereotype represents the subclassification of an element. It represents a class within the UML metamodel itself; that is, a type of modeling element. Some stereotypes are already predefined. You can also define your own stereotypes.
Stereotypes can be shown in the browser and on diagrams. The name of the stereotype may appear in angle brackets <<>>, depending on the settings found in either the Diagram or Browser tabs of the Options dialog box. Click Tools > Options to display the Options dialog box. Refer to the Stereotypes chapter for more information on stereotypes.
To show stereotypes on the diagrams, right-click a class, and then click Options > Stereotype Display > None, Label, Decoration, or Icon from the shortcut menu. These commands display the following information.
Export Control
The Export Control field specifies how a class and its elements are viewed outside of the defined package.
The Export Control field can be set only in the specification. No special annotation is related to access control properties.
To change the export control type for the class, click the appropriate option in the Export Control field. You can display the implementation export control in the component compartment. You can display visibility in an icon through the shortcut menu.
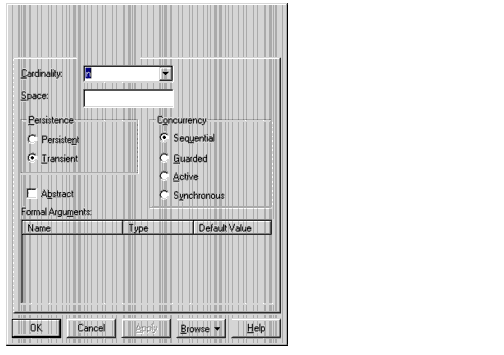
Class Specification--Detail Tab
Figure 19 Class Specification--Detail Tab
Refer to the descriptions in the Introduction to Specifications chapter for information on the specification elements not covered in the following section.
Cardinality
The Cardinality field specifies the number of expected instances of the class. In the case of relationships, this field indicates the number of links between each instance of the client class and the instance of the supplier. You can set a specific cardinality value for the client class, supplier class, or both.
Use the following syntax to express cardinality.
1 Where <literal> is any integer greater than or equal to one.
To display class cardinality on an icon, right-click the icon and select a cardinality through the shortcut menu. A literal value can only be specified on the specification.
Space
Use the Space field to document the amount of storage required by objects of the class during execution.
Persistence
Persistence defines the lifetime of the instances of a class. A persistent element is expected to have a life span beyond that of the program or one that is shared with other threads of control or other processes. Use this field to identify the persistence for elements of this class.
The persistence of an element must be compatible with the persistence that you specified for its class. If a class persistence is set to Persistent, then the object persistence is either persistent, static, or transient. If a class persistence is set to Transient, then the object persistence is either static or transient.
You can set the persistence only through the specification. This field is inactive for class utilities, parameterized class utilities, and instantiated class utilities.
To set the persistence, click the applicable option in the Persistence field. You can display the persistence in the diagram by clicking Show Persistence from the shortcut menu.
Concurrency
A class concurrency defines its semantics in the presence of multiple threads of control.
Abstract
The Abstract check box identifies a class that serves as a base class. An abstract class defines operations and states that will be inherited by subclasses. This field corresponds to the abstract class adornment displayed inside the class icon.
To toggle the abstract adornment, select or clear the abstract check box in the Class Specification.
When you click Abstract and you view the model in Booch notation, the abstract class adornment is displayed in the lower left corner of the class icon.
You can change the abstract class adornment only through the specification.
The Abstract field is inactive for metaclasses, class utilities, parameterized class utilities, and instantiated class utilities.
Formal Arguments
In the Parameterized Class or Parameterized Class Utility Specification, the formal, generic parameters declared by the class or class utility are listed.
In the Instantiated Class or Instantiated Class Utility Specification, the actual arguments that match the generic parameters of the class being instantiated are listed.
You can add, update, or delete parameters only through the Class Specification. This field applies only to parameterized classes, parameterized class utilities, instantiated classes, and instantiated class utilities.
To define the parameters for a class, position the pointer within the Parameters field and click Insert from the shortcut menu or press the insert key.
Parameters are displayed on class diagrams.
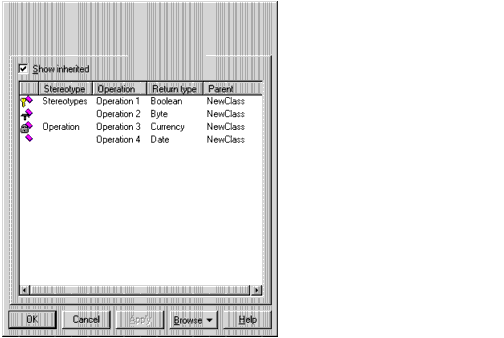
Class Specification--Operations Tab
Operations denote services provided by the class. Operations are methods for accessing and modifying Class fields or methods that implement characteristic behaviors of a class.
The Operations tab lists the operations that are members of this class. Rational Rose stores operation information in an Operation Specification. You can access Operation Specifications from the Class Specification or from the Browser.
Figure 20 Class Specification--Operations Tab
Refer to the descriptions in the Introduction to Specifications chapter for information on the specification elements not covered in the following section.
To enter an operation in the Class Specification, use Insert from the shortcut menu. Rational Rose adds the operation name to the operations list.
The descriptions for each field on the Operations tab are discussed below:
- Access Control Adornment (Unlabeled):
Public--members of a class are accessible to all clients.
Protected--members of a class are accessible only to subclasses, friends, or to the class itself.
Private--members of a class are accessible only to the class itself or to its friends.
Implemented--the class is accessible only by the implementation of the package containing the class.
- Stereotype--displays the name of the stereotype.
- Operation--displays the name of the operation.
- Return Type--identifies the type of value returned from the operation.
- Parent--identifies the class that defines the operation.
The Operation tab is active for all class types. In the class diagram, you can display operation names in the class compartment.
Show Inherited
Select the Show Inherited check box to see operations inherited from other classes. If there is no check mark in this field, you can view only operations associated with the selected class.
Class Specification--Attributes Tab
Figure 21 Class Specification--Attributes Tab
Refer to the descriptions earlier in this chapter and in the Introduction to Specifications chapter for information on the specification elements not covered in the following section.
The Rational Unified Process asserts that attributes are data values (string or integer) held by objects in a class. Thus, the Attributes tab lists attributes defined for the class through the Class Attribute Specification.
You can add an attribute relationship through Insert on the shortcut menu or by pressing the insert key. An untitled entry is added.
Attributes and relationships created using this technique are added to the model, but do not automatically appear in any diagrams.
The descriptions for each field are discussed below:
- Access Control Adornment (Unlabeled):
Public--members of a class are accessible to all clients.
Protected--members of a class are accessible only to subclasses, friends, or to the class itself.
Private--members of a class are accessible only to the class itself or to its friends.
Implemented--the class is accessible only by the implementation of the package containing the class.
- Stereotype--displays the name of the stereotype.
- Name--displays the name of the attribute.
- Class--identifies where the attribute is defined.
- Type--this can be a class or a traditional type, such as int.
- Initial--displays the initial value of an object.
This Attribute tab is active for all class types.
Class Specification--Relations Tab
Classes collaborate with other classes in a variety of ways. The Relations tab identifies the relationships in which this class is the client (class) and the corresponding supplier (end) class. If you labeled the relationship, Rational Rose displays its name after the kind of relationship.
Figure 22 Class Specification--Relations Tab
Refer to the descriptions earlier in this chapter or in the Introduction to Specifications chapter for information on the specification elements not covered in the following section.
Rational Rose automatically updates this list when you draw relationships between classes.
The description for each field is discussed below:
- Name--displays the name of the relationship.
- Parent--displays the client name.
- End Class--displays the supplier name.
Class Specification--Component Tab
Figure 23 Class Specification--Component Tab
Refer to the descriptions in the Introduction to Specifications chapter for information on the specification elements not covered in the following section.
Show All Components
Select this option if you want to get a list of all components in a model. If this option is not selected, you will see only the components to which this class is assigned.
Component Name
The component list identifies the components to which this class is assigned (with a check mark). A class can be assigned to a note or to several components with the same implementation language assigned.
You can assign the class to a component through Assign on the shortcut menu or by dragging a component from the browser and dropping it in the list.
Package Name
This field displays the package that the component belongs to.
Language
The Language field identifies the implementation language assigned to this element.
Note: When you change the implementation language of a component, the data types that are used in the specification of operations or attributes of the assigned classes are not automatically converted to data types in the new implementation language. Also if you change the implementation language for a component with classes assigned to other components, a dialog box is displayed and asks how to handle those classes.
Class Specification--Nested Tab
A nested class is a class that is enclosed within another class. Classes may contain instances of, inherit from, or use a nested class. Enclosing classes are referred to as parent classes, and a class that lies underneath the parent class is called a nested class.
Figure 24 Class Specification--Nested Tab
Refer to the descriptions earlier in this chapter and in the Introduction to Specifications chapter for information on the specification elements not covered in the following section.
A nested class is typically used to implement functionality for the parent class. In many designs, a nested class is closely coupled to the parent class and is often not visible outside of the parent class. For example, think of your computer as a parent class and its power supply as a nested class. While the power supply is not visible outside the computer, the task it completes is crucial to the overall functionality of the computer.
Note: Nested classes can be cut and pasted.
To add a nested class to a class specification:
- 1 Create and name a class.
- 2 Display the Class Specification.
- 3 Click the Nested tab.
- 4 Right-click to display the shortcut menu, and then click Insert.
- 1 Click Query > Add Classes.
- 2 Select the nested class and place it in the Selected Classes list box.
To delete a nested class from a class specification:
- 1 Select the nested class from the Nested tab in the Class Specification.
- 2 Right-click the class to display a shortcut menu.
- 3 From the shortcut menu, click Delete.
- 1 Select the name of the nested class from the Nested Classes list box in the Class Specification.
- 2 Press the DELETE key.
If you delete a nested class that is also a parent to other nested classes, all the nested classes will be deleted.
Note: When you attempt to delete a nested class from a Class Specification, a warning message will appear to verify the deletion.
To relocate nested classes from the browser to a specification:
Classes and nested classes can be moved from the browser to the Class Specification Nested tab. If you move a class (NewClassA) from the browser and place it directly on top of a class (NewClassB) on the Nested tab, NewClassA becomes nested underneath NewClassB. However, only one level of class nesting appears on the Nested tab. You can view all levels of nesting in the browser.
For additional information on the browser, refer to The Browser chapter.
To move nested classes between class specifications:
Nested classes can be dragged and dropped between Class Specification Nested tabs.
Class Specification--Files Tab
Refer to the descriptions in the Introduction to Specifications chapter for information on this tab.
Class Attribute SpecificationA Class Attribute Specification allows you to display and modify the properties of a class attribute in the current model.
To display an Attribute Specification, select the entry on the Attribute tab of the Class Specification and click Insert from the shortcut menu. Alternatively, double-clicking the entry will display the Class Attribute Specification.
Specification Content
The Class Attribute Specification consists of the following tabs: General and Detail.
Class Attribute--General Tab
Figure 25 Class Attribute--General Tab
Refer to the descriptions earlier in this chapter and in the Introduction to Specifications chapter for information on the specification elements not covered in the following section.
Class
The class to which the attribute belongs is displayed in this static field.
Show Classes
Select the Show Classes check box to list all classes defined in the model and any fundamental types that reside in the model.
If you clear this check box, the selection lists include only the fundamental types that reside in the model.
Type
Attribute types can either be classes or language-specific types. When the attribute is a data value, the type is defined as a language-specific type. You can enter the type in the Type field of the Class Attribute Specification. Rational Rose displays the type beside the attribute name in the class icon and updates the information in the model.
Initial Value
You can assign an initial value to your class attribute through this field. Click the Initial Value field and enter the value.
Class Attribute--Detail Tab
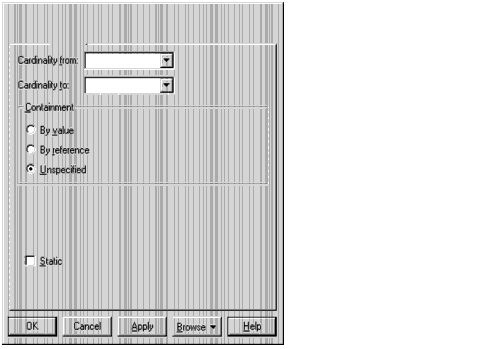
Figure 26 Class Attribute--Detail Tab
Containment
Physical containment plays a role in the construction and destruction of an aggregate's parts through semantics. The specification of physical containment is necessary for meaningful code generation from the model.
You can set one of the following types of physical containment.
To set or change the containment type in the Relationship Specification, click the applicable option in the Containment field. The application places an adornment at the supplier end of the relationship. You can also select a value from the shortcut menu.
Static
Select the Static check box to specify that the client class, not the client's instances, owns the supplier class. In the case of an attribute, a static attribute is an attribute whose value is common to a class of objects rather than a value peculiar to each instance.
You can set this field in the specification or through the shortcut menu.
Derived
The Derived check box indicates whether the element was computed (derived) or implemented directly.
To define a element as derived, select the Derived check box. The element name is adorned by a "/" in front of the name.
Operation SpecificationYou should complete one Operation Specification for each operation that is a member of a class and for all free subprograms.
If you change the property of a class operation by editing its specification, Rational Rose will update all class diagrams containing icons representing that class.
To access the Operation Specification, select an entry on the Operation tab of the Class Specification and double-click the entry or click Insert from the shortcut menu. You can also bring the specification up through the shortcut menu.
Specification Content
The Operation Specification consists of the following tabs: General, Detail, Preconditions, Semantics, Postconditions, and Files.
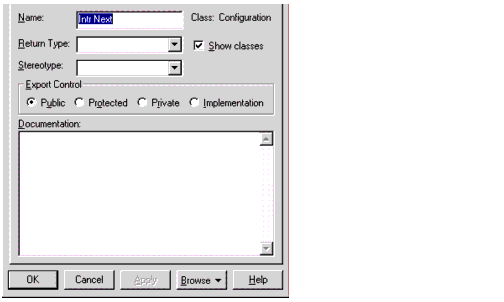
Operation Specification--General Tab
Figure 27 Operations Specification--General Tab
Refer to the descriptions earlier in this chapter or in the Introduction to Specifications chapter for information on the specification elements not covered in the following section.
Return Type
For operations that are functions, set this field to identify the class or type of the function's result. If Show classes is checked, the list box displays all the classes in the package. If Show classes is not checked, only the predefined set of return class types is displayed.
If you enter a class name and it does not exist in your model, the application does not create one.
Operation Specification--Detail Tab
Figure 28 Operation Specification--Detail Tab
Refer to the descriptions in the Introduction to Specifications chapter for information on the specification elements not covered in the following section.
Arguments
This field contains a list of the arguments of the operation. You may express these arguments in your selected implementation language.
The argument list can be rearranged with the click and drag technique. Select an argument from the list, drag it to the location, and release. The list will reflect the new order.
Protocol
This field lists a set of operations that a client can perform on an object and the legal orderings in which they might be invoked. The protocol of an operation has no semantic impact.
Qualifications
This field identifies language-specific features that qualify the method. You will find this especially useful in Common Lisp Object System (CLOS), in which methods can be described as before or after.
Exceptions
This field contains a list of the exceptions that can be raised by the operation. Enter the name of one or more classes identifying the exception.
Size
This field identifies the relative or absolute amount of storage consumed by the invocation of the operation.
Time
This field contains a statement about the relative or absolute time required to complete an operation. Use this field to budget time for the operation.
Concurrency
This field denotes the semantics in the presence of multiple threads of control. The Concurrency field shows the concurrency for the elements of a class. The concurrency of an operation should be consistent with its class.
You can set the concurrency of a class only through the Class Specification. The Concurrency field is inactive for class utilities, parameterized class utilities, and instantiated class utilities.
To change the concurrency, click an applicable option in the Concurrency field. You can display the concurrency in the class diagram by clicking Show Concurrency from the shortcut menu.
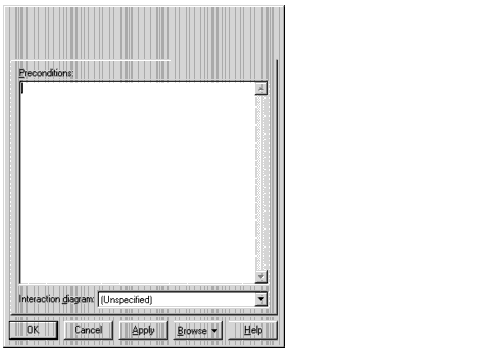
Operation Specification--Preconditions Tab
Figure 29 Operation Specification--Preconditions Tab
Refer to the descriptions in the Introduction to Specifications chapter for information on the specification elements not covered in the following section.
Preconditions
Invariants that are assumed by the operation (the entry behavior of an operation) are listed.
Interaction Diagram
Select an interaction diagram from the list that illustrates the appropriate semantics.
Operation Specification--Semantics Tab
Figure 30 Operations Specification--Semantics Tab
Refer to the descriptions in the Introduction to Specifications chapter for information on the specification elements not covered in the following section.
Semantics
The action of the operation is shown in this area.
Interaction Diagram
Select an interaction diagram from the list box that illustrates the appropriate semantics.
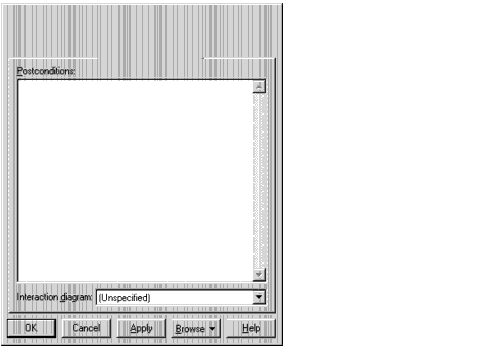
Operation Specification--Postconditions Tab
Figure 31 Operation Specification--Postconditions Tab
Refer to the descriptions in the Introduction to Specifications chapter for information on the specification elements not covered in the following section.
Postconditions
Invariants that are satisfied by the operation (the exit behavior of an operation) are listed in this area.
Interaction Diagram
Select an interaction diagram from the list box that illustrates the appropriate semantics.
Operation Specification--Files Tab
Refer to the descriptions in the Introduction to Specifications chapter for information on this tab.
Parameter SpecificationA Parameter Specification allows you to modify an argument of an operation.
Specification Content
The Parameter Specification consists of the General tab.
Defining a New Parameter
To display a Parameter Specification:
- 1 From a Class Specification Operation Tab, double-click an operation to display the Operation Specification.
- 2 Click the Detail tab.
- 3 Move the pointer to the arguments section.
- 4 Right-click to display the shortcut menu.
- 5 Click Insert, and a new argument is added.
- 6 Double-click the argument to display the Parameter Specification.
Parameter Specification--General Tab
Figure 32 Parameter Specification--General Tab
Refer to the descriptions in the Introduction to Specifications chapter for information on the specification elements not covered in the following section.
Default
The default field may contain a value that an instance takes unless otherwise specified.
Owner
The operation is the owner of the parameter.
Type
Type is a description of a set of instances that share the same operations, abstract attributes and relationships, and semantics. Depending upon the language installed, different types will appear.
Association SpecificationAn association represents a bidirectional semantic relationship between two classes.
To display the association specification, double-click any icon representing the processor or click Browse > Specifications.
Specification Content
The Association Specification consists of the following tabs: General, Detail, Role A and Role B General, and Role A and Role B Detail.
Association Specification--General Tab
Figure 33 Association Specification--General Tab
Refer to the descriptions in the Introduction to Specifications chapter for information on the specification elements not covered in the following section.
Parent
The parent to which the component belongs (its package) is displayed in this static field.
Stereotype
A stereotype represents the subclassification of an element. It represents a class within the UML metamodel itself (that is, a type of modeling element). Some stereotypes are predefined. You can define your own stereotypes.
Role
Use this field to label the role with a name that denotes the purpose or capacity wherein one class associates with another.
To enter a role name, click in the Role field and enter the text.
Element
The Element field describes the two elements linked by this association. This field cannot be edited.
Association Specification--Detail Tab
Figure 34 Association Specification--Detail Tab
Refer to the descriptions in the Introduction to Specifications chapter for information on the specification elements not covered in the following section.
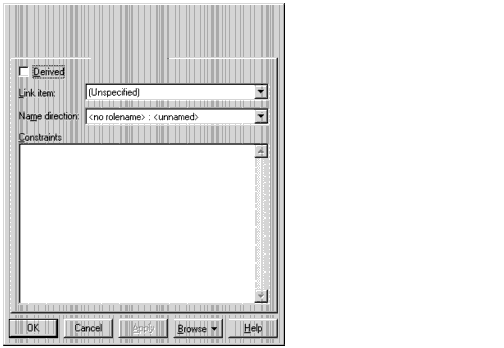
Derived
This field indicates whether the element was computed (derived) or implemented directly.
To define an element as derived, select the Derived check box. The element name is adorned by a "/" in front of the name.
Link Element
This field lists the attributed associations linked to the association. These attributed associations apply to the association as a whole.
Name Direction
This field defines the direction of an association name.
Constraints
The constraint is an expression of some semantic condition that must be preserved while the system is in a steady state. The constraint on the Detail tab applies to the association as a whole, while the constraint on the Detail A or Detail B tab applies to a particular role.
To apply a constraint, click the Constraint field and enter the text. A constraint is displayed notationally, surrounded by braces under the role to which it applies.
Association Specification--Role B General Tab
Figure 35 Association Specification--Role A and B General Tab
Refer to the descriptions earlier in this chapter or in the Introduction to Specifications chapter for information on the specification elements.
Association Specification--Role A and B Detail Tab
Figure 36 Association Specification--Role A and B Detail Tab
Refer to the descriptions in the Introduction to Specifications chapter for information on the specification elements not covered in the following section.
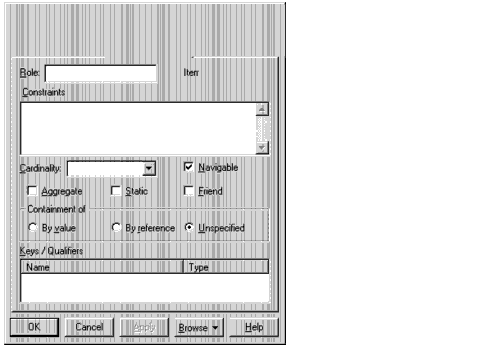
Navigable
The Navigable field indicates the direction in which the role is navigating. By default, roles are bidirectional and no navigation notation is provided.
To set a role's navigation, select the Navigable check box in the Association Specification or click Navigable through the shortcut menu. The navigable arrowhead points in the direction of the role, unless a containment adornment is displayed. Containment adornments override navigable adornments.
Aggregate
Use the Aggregate field to set a direction to either all or part of the relationship among instances of these classes. Only one end of the relationship can be aggregate.
To set the aggregate adornment, select the Aggregate check box in the Association Specification or click Aggregate through the shortcut menu. The adornment is a diamond on the relationship.
Static
Use the Static field to specify that the client class, not the client's instances, owns the supplier class. In the case of an attribute, a static attribute is an attribute whose value is common to a class of objects rather than a value peculiar to each instance.
You can set this field in the specification or through the shortcut menu. To switch the static adornment in the Relationship Specification, select the Static check box.
Friend
The Friend check box designates that the supplier class has granted rights to a client class to access its non-public parts.
You can select this check box in the Relationship Specification or through the relationship's shortcut menu.
Containment of
Physical containment has semantics that play a role in the construction and destruction of an aggregate's parts. The specification of physical containment is necessary for meaningful code generation from the model.
You can set one of the following types of physical containment.
You can change the containment type in the Relationship Specification or you can select a value from the relationship's shortcut menu.
Keys/Qualifiers
A key or qualifier is an attribute that uniquely identifies a single target object. The attributes allow 1..n or n..n associations and reduce the number of instances. The list box will display all keys or qualifiers currently defined.
To enter a key or qualifier, click Insert from the shortcut menu or press the Insert key. An untitled entry is placed in the name and type field. To change the entry, select to highlight and type in a new name.
For information on the Key/Qualifier Specification, refer to the Key/Qualifier Specification.
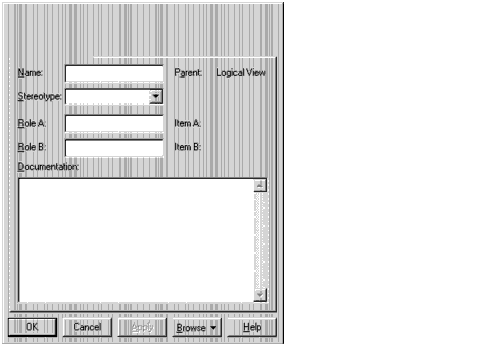
Generalize SpecificationA generalize relationship between classes shows that one class shares the structure or behavior defined in one or more other classes.
Specification Content
The Generalize Specification consists of the General tab.
Generalize Specification--General Tab
Figure 37 Generalize Specification--General Tab
Refer to the descriptions earlier in this chapter or in the Introduction to Specifications chapter for information on the specification elements not covered in the following section.
Friendship Required
Select the Frendship required check box to specify that the supplier class has granted rights to the client class to access its non-public members.
Virtual Inheritance
Select the Virtual Inheritance check box to ensure that only one copy of the base class will be inherited by descendants of the subclasses.
Realize SpecificationA realize relationship connects a class to an interface or a component to an interface.
Specification Content
The Realize Specification consists of the General tab.
Realize Specification--General Tab
Figure 38 Realize Specification--General Tab
Refer to the descriptions earlier in this chapter or in the Introduction to Specifications chapter for information on the specification elements.
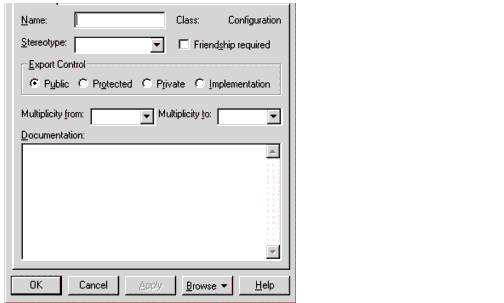
Dependency SpecificationThe dependency relationship indicates that the client class depends on the supplier class to provide certain services. One class can use another class in a variety of ways. Typically, a dependency relationship indicates that the operations of the client invoke operations of the supplier. Dependency relationships appear on component diagrams and they can also be used to connect use cases.
Note: A dependency that connects two use cases together contains a simpler form of the Dependency Specification in Figure 39. Only the name, class, stereotype, and documentation fields are present.
Specification Content
The Dependency Specification consists of the General tab.
Dependency Specification--General Tab
Figure 39 Dependency Specification--General Tab
Refer to the descriptions earlier in this chapter or in the Introduction to Specifications chapter for information on the specification elements.
Has Relationship (Booch Only)A has relationship shows a whole and part relationship between two classes, where one class is the whole and the other is the part. The whole class contains or owns its parts. This relationship is also called an aggregation relationship.
Because attributes for a class can be expressed by a has by-value relationship with cardinality of "1," attributes are also defined in the has relationship specifications.
To display a has relationship's specification, select any icon representing the has relationship and either double-click or click Browse > Specifications.
Specification Content
The Has Specification consists of the following tabs: General and Detail.
Has Specification--General Tab
Figure 40 Has Specification--General Tab
Refer to Class Attribute--General Tab for more information.
Has Specification--Detail Tab
Figure 41 Has Specification--Detail Tab
Refer to the descriptions earlier in this chapter or in the Introduction to Specifications chapter for information on the specification elements.
Key/Qualifier SpecificationA Key/Qualifier Specification allows you to modify a specific attribute whose value uniquely identifies a single target object.
Defining a New Key/Qualifier
To display a Key/Qualifier Specification:
- 1 Double-click an association or aggregation.
- 2 From either the Association Specification or the Aggregation Specification, click the Role A Detail or Role B Detail tab.
- 3 Move the pointer to the Key/Qualifier section of either specification.
- 4 Right-click to display the shortcut menu.
- 5 Click Insert to add a key/qualifier.
- 6 Double-click the entry to display the Key/Qualifier Specification.
Specification Content
The Key/Qualifier Specification consists of the General tab.
Key/Qualifier Specification--General Tab
Figure 42 Key/Qualifier Specification--General Tab
Refer to the descriptions in the Introduction to Specifications chapter for information on the specification elements not covered in the following section.
Owner
The Owner field identifies the name, or owner, of the role from which the key/qualifier evolved.
| Rational Software Corporation
http://www.rational.com support@rational.com techpubs@rational.com Copyright © 1993-2001, Rational Software Corporation. All rights reserved. |