Installing the Product This chapter details how to install Rational Suite and includes the following topics:
- Upgrading Rational Suite
- Installing Rational Suite (UNIX Components)
- Installing the Online Documentation
- Verifying Your Installation
- Running the User Setup Script
- Integrating Products That Are Not Part of the Suite
- Changing the Primary RUP Variant
- Installing Rational Suite (Windows Components)
- Configuring and Testing RequisiteWeb
- Removing the Rational Suite Software
- Next Steps
Note: If you have not reviewed Before You Install, you should do so before proceeding.
Upgrading Rational SuiteUpgrading from Version 2001A.04.00 or 2000.02.10
If you are upgrading from version 2001A.04.00 or 2000.02.10, you may use your existing license.
- 1 Install the product by running rs_install. For complete instructions, see Installing Rational Suite (UNIX Components).
- 2 Choose option 1, use an existing FLEXlm license file, from the Licensing Options Menu.
- 3 After you have completed the upgrade, you may wish to remove the previous version to recover disk space. See Removing the Rational Suite Software.
If you have previously installed version 3.0.1, 3.0.3, or 3.1.0 of Rational SoDA, you may choose to use the installation of FrameMaker+SGML bundled with that release. To do this, copy the entire SoDA directory to a new location and uninstall the previous version of Rational Suite. This way, you do not accidentally remove the previous version of Rational SoDA when you uninstall the Suite.
Upgrading from a Release Prior to Version 2000.02.10
As of version 2000.02.10, all license management is done through Rational AccountLink, a new online licensing web tool. You need to return your old license keys and request new license keys before you can install Rational Suite. For information, see Requesting License Keys.
- 1 Install the product by running rs_install. For complete instructions, see Installing Rational Suite (UNIX Components).
- 2 Choose option 2, setup a permanent or term-license-agreement, from the Licensing Options Menu.
- 3 After you have completed the upgrade, you may wish to remove the previous version to recover disk space. See Removing the Rational Suite Software.
If you have previously installed version 3.0.1, 3.0.3, or 3.1.0 of Rational SoDA, you may choose to use the installation of FrameMaker+SGML bundled with that release. To do this, copy the entire SoDA directory to a new location and uninstall the previous version of Rational Suite. This way, you do not accidentally remove the previous version of Rational SoDA when you uninstall the Suite.
Installing Rational Suite (UNIX Components)This section provides instructions about how to install the UNIX products that are part of Rational Suite. The rs_install command is a complete installer that includes licensing setup, license checking, product installation, and product setup. Rational recommends that you follow the menus and prompts and allow rs_install to guide you through the installation.
Default values, where provided, are enclosed in square brackets. To accept the default value, simply press the Enter key.
Note: The term rational_dir is used throughout this guide to refer to the directory in which you install Rational Suite.
Installing in Secure Environments
Problems may occur when trying to perform a remote installation of Rational Suite in a secure environment (for example, remote access to other machines is through ssh) if the environment does not have access to rsh or remsh. To install Rational Suite in this situation, perform a local installation of the software rather than a remote installation. If you experience further problems, contact Rational Technical Support.
Installing Multiple OS Versions of Rational Suite
If you wish to install different OS versions of Rational Suite (for example, Solaris and HP-UX) on the same file server, it is recommended that you install them in different Rational directories (referred to as rational_dir). If you install them into the same Rational directory, you will not be able to uninstall a single OS version later, if necessary. The uninstall script will remove all OS versions that reside in the same Rational directory.
Stopping and Restarting an Installation
You can stop an installation by entering q to quit the installation. If you choose q, most of your input is saved in a user defaults file that is located in rational_dir/config/defaults. The file name itself is in the following format: rs_install.release_name.user_name.
The user defaults file contains general purpose defaults specific to you and the license server that you configure. It also keeps track of the product-specific information for the installation of this specific Suite and version.
Note: If you enter q!, your entries are not saved to the user defaults file.
You can restart the installation by running rs_install again.You should notice that many of your entries appear as the default value. Simply press the Enter key to continue with the installation. After you get to the Enter Install Mode screen you can choose one of three options:
- Ask - if you want to be prompted whether or not to reinstall the product
- Skip - if you want rs_install to automatically skip any product that has already been installed
- Reinstall - if you want rs_install to automatically uninstall and reinstall the product.
Installing Rational Suite DevelopmentStudio
Use the following procedure to install Rational Suite DevelopmentStudio.
To install Rational Suite DevelopmentStudio:
- 1 Log on to the install client. This can be any UNIX computer that:
- Gives you access to a CD-ROM drive
- Mounts the file system into which you will load the Rational Suite release
- Runs the operating system specified on the Rational Solutions for UNIX CD (Solaris 2.6, Solaris 7 or Solaris 8; or HP-UX 10.20, 11.0 or 11.11)
Note: You do not need to be root to install the product.
- 2 Place the Rational Solutions for UNIX CD in the CD-ROM drive.
If the CD-ROM drive is not mounted, supplemental instructions can be found in the appendix, Accessing the CD-ROM Drive.
- 3 Run the installation script, rs_install, which is located at the root level of the CD.
rs_install can be invoked with a number of options. For example, the -no_log (-nl) option can be used to stop rs_install from creating a log file. To see a listing of all available options, run rs_install -help.
- 4 Enter the directory where you will install Rational Suite DevelopmentStudio.
Note: For the Rational directory, supply a pathname such as: /vendor/rational. The directory needs to be visible on all computers from which you want to run this product, and must be writable by the installer's user name. Also, the NFS name for the directory must be the same on all computers.
- 5 Read through the license agreement and answer yes (y) to accept the terms.
- 6 Choose option 1 from the Product and License Configuration Selection Menu. The following table summarizes all of the options for this menu.
- 7 Choose your license option from the Licensing Options Menu. Options are summarized in the following table.
- 8 Do one of the following:
- If you are using an existing license, go to Step 9.
- If you are using a temporary license, go to Step 10.
- If you are using a permanent license, go to Step 11.
- 9 Enter the path to the license file or enter the port information.
Note: If the license server is running, it is preferable to specify the port. Enter port@host, where port is the TCP/IP port number used by the license server and the host is the hostname of the license server.
Go to Step 13.
- 10 Enter the temporary license key information from your license key certificate:
- License key
- License type
- Expiration date
Note: You are prompted for your license key information for both the Rational Suite DevelopmentStudio (UNIX Components) and Rational Suite DevelopmentStudio (Windows Components). If you are using a UNIX license server to manage the Windows Components licenses, enter your temporary license key information. If you are using a Windows server to manage licenses for the Windows Components, or you do not plan to use the Windows Components, enter 0.
When you have finished, go to Step 13.
- 11 Provide your license file information by doing one of the following:
- Import the information from the license file automatically by giving the path to the .upd file. This is the file that AccountLink sends to an e-mail account when you request a license. It has the filename format similar to license_for_server.upd.
- Enter none to provide the license key information manually. You will need a printout of the content of the .upd file. Follow the prompts to enter the information.
- 12 Define the location for the license.dat file that will be created from the information supplied by the license_for_server.upd file. By default, rs_install creates the license.dat file and stores it in the rational_dir/config directory.
Choose either the default path (option 1) that rs_install has selected or choose option 2 to specify an alternate path.
- 13 Proceed with the License Check Menu. Do one of the following:
- If you are using an existing license, run through options 1 and 3. Note that these options are the default settings provided by rs_install. There is no need to restart the license server (option 2) if it is already running.
- If you are using a permanent floating license, run through options 1-3 sequentially and forward to the next menu. If you are setting up a permanent node-locked license, run through option 1 only. Note that these options are the default settings provided by rs_install.
- If you are using a Rational Suite (UNIX Components) temporary license, run through option 1 and forward to the next menu. If you are using a Rational Suite (Windows Components) temporary license, run through options 1-3 sequentially and forward to the next menu. Note that these options are the default settings provided by rs_install.
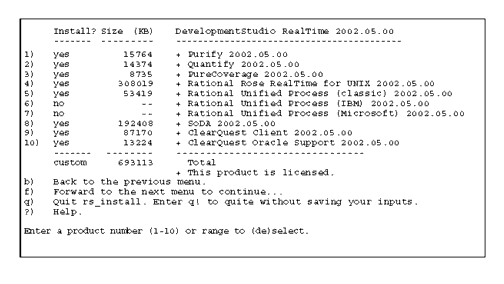
- 14 The Product Customization Menu allows you to refine your Suite product installation. The default settings for Rational Suite DevelopmentStudio (Solaris) are shown in Figure 5. The default settings for Rational Suite DevelopmentStudio (HP_UX) are shown in Figure 6. To change the installation setting between yes and no, enter the product number. Once you have the settings you desire, enter f to forward to the next menu.
Note: To accommodate heterogeneous environments, the Product Customization Menu gives you the ability to install Rational Unified Process (RUP) for IBM and Microsoft environments on a UNIX server. The default installation settings install the UNIX version of RUP (classic) but you may install any or all variants to support existing clients running in IBM or Microsoft environments. To install other versions of RUP, enter the corresponding number for the variant that you want to install. To deselect the classic version of RUP, enter its number to change the selection to no.
Note: Actual file sizes may vary from that shown in Figure 5 and Figure 6.
Figure 5 Product Customization Menu: Solaris
Figure 6 Product Customization Menu: HP-UX
- 15 The Rational Rose Product Component Customization Menu allows you to customize your Rose installation. This menu only applies if you are installing Rational Suite DevelopmentStudio. To change the installation setting between yes and no, enter the product number. Once you have the settings you want, enter f to forward to the next menu.
Warning: Some components have dependencies and deselecting one may affect the execution of another. Contact Rational Technical Support for more information about component dependencies.
- 16 The SoDA Product Configuration Menu allows you to customize your SoDa installation. Options are summarized in the following table. Note that all options install SoDA demos and training files.
- 17 The SoDA Product Component Customization Menu allows you to customize your SoDA installation. To toggle the installation setting between yes and no, enter the product number. After you have the settings you want, enter f to forward to the next menu.
- 18 The Install Documentation Menu allows you to install online documentation for Rational Purify, Quantify, and PureCoverage.
- 19 The Enter Install Mode menu allows you to decide whether you want rs_install to prompt you before it reinstalls a product, skip a product if it is already installed on your system, or reinstall the product without confirmation.
- 20 You are prompted to configure the cache directory for Rational Purify, Rational PureCoverage, and Rational Quantify. Do one of the following:
- Enter no to accept the default directory.
- Enter yes to specify an alternate location and follow the prompts.
- 21 The following prompt is displayed if you are installing Rational Suite DevelopmentStudio:
- 22 Define the read/write privileges: Owner writable, Owner and group writable, or Writable by all.
- 23 Are you configuring SoDA to work with Apex? Enter a value Yes or No.
- 24 Enter the FrameMaker + SGML directory. Do one of the following:
- If you do not have FrameMaker + SGML installed on your system, enter none. Continue with the installation and see Integrating Products That Are Not Part of the Suite after you have finished installing.
- If you have FrameMaker + SGML installed, enter the path.
Note: This release of SoDA does not include FrameMaker + SGML. You need to have either version 5.5 or 6.0 installed to use SoDA.
- 25 Use ClearQuest with SoDA? Enter a value Yes or No.
If you choose Yes, you will be prompted to provide the path to the ClearQuest installation. If you chose to install ClearQuest in Step 14, the default path is rational_dir/releases/ClearQuestClient.2002.05.00. You can accept the default or specify another path.
- 26 The Web Setup Menu allows you to enter the URLs for a Requisite Web server or a ClearQuest Web server. These applications run on a Windows server and can be accessed by UNIX developers through a web browser. Do one of the following:
- If you do not plan to use these web interfaces, enter none.
- If you do not know the URL for these servers, enter none and run the web_setup command after you have the URLs.
- If you know the URLs, enter them now.
- 27 If you chose to install more than one Rational Unified Process variant in Step 14, you are prompted to select which variant you wish to use as the primary. Enter an option (1-3) to select the primary variant. The default setting is the UNIX (classic) version of RUP.
Note: You may change the primary RUP variant at any time by running the post_install command. For more information see Changing the Primary RUP Variant.
The installation of the Rational Suite DevelopmentStudio is now complete.
Installing Rational Suite DevelopmentStudio RealTime
Use the following procedure to install Rational Suite DevelopmentStudio RealTime.
To install Rational Suite DevelopmentStudio RealTime:
- 1 Log on to the install client. This may be any UNIX computer that:
- Gives you access to a CD-ROM drive
- Mounts the file system into which you will load the Rational Suite release
- Runs the operating system specified on the Rational Solutions for UNIX CD (Solaris 2.6, Solaris 7, or Solaris 8; or HP-UX 10.20)
Note: You do not need to be root to install the product.
- 2 Place the Rational Solutions for UNIX CD in the CD-ROM drive.
If the CD-ROM drive is not mounted, supplemental instructions can be found in the appendix, Accessing the CD-ROM Drive.
- 3 Run the installation script, rs_install, which is located at the root level of the CD.
rs_install can be invoked with a number of options. For example, the -no_log (-nl) option can be used to stop rs_install from creating a log file. To see a listing of all available options, run rs_install -help.
- 4 Enter the directory where you will install Rational Suite DevelopmentStudio RealTime.
Note: For the Rational directory, supply a pathname such as: /vendor/rational. The directory needs to be visible on all computers from which you want to run this product, and must be writable by the installer's user name. Also, the NFS name for the directory must be the same on all computers.
- 5 Read through the license agreement and answer yes (y) to accept the terms.
- 6 Choose option 2 from the Product and License Configuration Selection Menu. The following table summarizes all of the options for this menu.
- 7 Choose your license option from the Licensing Options Menu. Options are summarized in the following table.
- 8 Do one of the following:.
- If you are using a temporary license, go to Step 9.
- If you are using a permanent license, go to Step 10.
- 9 Enter the temporary license key information from your license key certificate:
- License key
- License type
- Expiration date
Note: You are prompted for your license key information for both the Rational Suite DevelopmentStudio RealTime (UNIX Components) and Rational Suite DevelopmentStudio RealTime (Windows Components). If you are using a UNIX license server to manage the Windows Components licenses, enter your temporary license key information. If you are using a Windows server to manage licenses for the Windows Components, or you do not plan to use the Windows Components, enter 0.
When you have finished, go to Step 12.
- 10 Provide your license file information by doing one of the following:
- Import the information from the license file automatically by giving the path to the .upd file. This is the file that AccountLink sends to an e-mail account when you request a license. It has the filename format similar to license_for_server.upd.
- Enter none to provide the license key information manually. You will need a printout of the content of the .upd file. Follow the prompts to enter the information.
- 11 Define the location for the license.dat file that will be created from the information supplied by the license_for_server.upd file. By default, rs_install creates the license.dat file and stores it in the rational_dir/config directory.
Choose either the default path (option 1) that rs_install has selected or choose option 2 to specify an alternate path.
- 12 Proceed with the License Check Menu. Do one of the following:
- If you are using an existing license, run through options 1 and 3. Note that these options are the default settings provided by rs_install. There is no need to restart the license server (option 2) if it is already running.
- If you are using a permanent floating license, run through options 1-3 sequentially and forward to the next menu. If you are setting up a permanent node-locked license, run through option 1 only. Note that these options are the default settings provided by rs_install.
- If you are using a Rational Suite (UNIX Components) temporary license, run through option 1 and forward to the next menu. If you are using a Rational Suite (Windows Components) temporary license, run through options 1-3 sequentially and forward to the next menu. Note that these options are the default settings provided by rs_install.
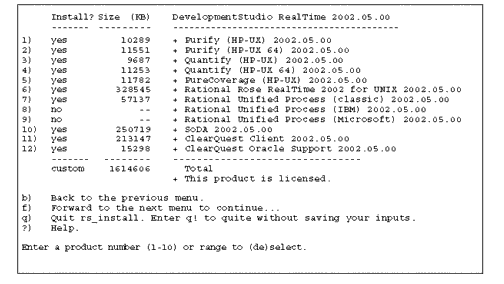
- 13 The Product Customization Menu allows you to refine your Suite product installation. The default settings for Rational Suite DevelopmentStudio RealTime (Solaris) are shown in Figure 5. The default settings for Rational Suite DevelopmentStudio RealTime (HP-UX) are shown in Figure 6. To change the installation setting between yes and no, enter the product number. Once you have the settings you desire, enter f to forward to the next menu.
Note: To accommodate heterogeneous environments, the Product Customization Menu gives you the ability to install Rational Unified Process (RUP) for IBM and Microsoft environments on a UNIX server. The default installation settings install the UNIX version of RUP (classic) but you may install any or all variants to support existing clients running in IBM or Microsoft environments. To install other versions of RUP, enter the corresponding number for the variant that you want to install. To deselect the classic version of RUP, enter its number to change the selection to no.
Note: Actual file sizes may vary from that shown in Figure 5 and Figure 6.
Figure 7 Product Customization Menu: Solaris (RealTime Edition)
Figure 8 Product Customization Menu: HP-UX (RealTime Edition)
- 14 The SoDA Product Configuration Menu allows you to customize your SoDa installation. Options are summarized in the following table. Note that all options install SoDA demos and training files.
- 15 The SoDA Product Component Customization Menu allows you to customize your SoDA installation. To toggle the installation setting between yes and no, enter the product number. After you have the settings you want, enter f to forward to the next menu.
- 16 The Install Documentation Menu allows you to install online documentation for Rational Purify, Quantify, and PureCoverage.
- 17 The Enter Install Mode menu allows you to decide whether you want rs_install to prompt you before it reinstalls a product, skip a product if it is already installed on your system, or reinstall the product without confirmation.
- 18 You are prompted to configure the cache directory for Rational Purify, Rational PureCoverage, and Rational Quantify. Do one of the following:
- Enter no to accept the default directory.
- Enter yes to specify an alternate location and follow the prompts.
- 19 Are you configuring SoDA to work with Apex? Enter a value Yes or No.
- 20 Enter the FrameMaker + SGML directory. Do one of the following:
- If you do not have FrameMaker + SGML installed on your system, enter none. Continue with the installation and see Integrating Products That Are Not Part of the Suite after you have finished installing.
- If you have FrameMaker + SGML installed, enter the path.
Note: This release of SoDA does not include FrameMaker + SGML. You need to have either version 5.5 or 6.0 installed to use SoDA.
- 21 Use ClearQuest with SoDA? Enter a value Yes or No.
If you choose Yes, you will be prompted to provide the path to the ClearQuest installation. If you chose to install ClearQuest in Step 14, the default path is rational_dir/releases/ClearQuestClient.2002.05.00. You can accept the default or specify another path.
- 22 Use RoseRT with SoDA? Enter a value Yes or No.
- 23 The Web Setup Menu allows you to enter the URLs for a Requisite Web server or a ClearQuest Web server. These applications run on a Windows server and can be accessed by UNIX developers through a web browser. Do one of the following:
- If you do not plan to use these web interfaces, enter none.
- If you do not know the URL for these servers, enter none and run the web_setup command after you have the URLs.
- If you know the URLs, enter them now.
- 24 If you chose to install more than one Rational Unified Process variant in Step 14, you are prompted to select which variant you wish to use as the primary. Enter an option (1-3) to select the primary variant. The default setting is the UNIX (classic) version of RUP.
Note: You may change the primary RUP variant at any time by running the post_install command. For more information see Changing the Primary RUP Variant.
The installation of the Rational Suite DevelopmentStudio RealTime is now complete.
Installing Rational Rose RealTime Companion Products
Rational Rose RealTime Professional Edition includes additional software that extends Rational Rose RealTime to provide support for many embedded targets. The following two products are provided on the Rational Rose RealTime Companion Products CD:
- Rational Connexis
- Rational Quality Architect - RealTime Edition (RQA-RT)
For instructions on how to install the above products, see the Release Notes and Installation Guide - Rational Rose RealTime Professional Edition. Before you can use Rational Connexis, you must set the Connexis environment variable. This information is provided in the Release Notes and Installation Guide - Rational Rose RealTime Professional Edition.
Installing the Online Documentation
Use the following procedure to install the online documentation.
To install the online documentation:
- 1 Log on to the install client. This may be any UNIX computer that:
- Gives you access to a CD-ROM drive
- Mounts the file system into which you will load the Rational Suite release
- Runs the operating system specified on the Rational Solutions for UNIX Online Documentation CD (Solaris 2.6, Solaris 7, or Solaris 8; or HP-UX 10.20, 11.0, or 11.11)
Note: You do not need to be root to install the product.
- 2 Place the Rational Solutions for UNIX Online Documentation CD in the CD-ROM drive.
If the CD-ROM drive is not mounted, supplemental instructions can be found in the appendix, Accessing the CD-ROM Drive.
- 3 Run the installation script, rs_install, which is located at the root level of the CD.
rs_install can be invoked with a number of options. For example, the -no_log (-nl) option can be used to stop rs_install from creating a log file. To see a listing of all available options, run rs_install -help.
- 4 The Install Documentation Menu allows you to refine your online documentation installation. The default settings are shown in Figure 9.
To change the installation setting between yes and no, enter the product documentation number. Once you have the settings you desire, enter f to forward to the next menu.
Note: Actual file sizes may vary from that shown in Figure 9.
Figure 9 Install Documentation Menu
- 5 The Tool Customization Menu allows to you install Netscape 4.7 and Adobe Acrobat 4.0. The default setting is set to install both products.
If you choose to install the version of Netscape provided with Rational Suite, it is configured so that Adobe Acrobat is automatically launched when you click a link to a PDF file.
If you choose not to install the version of Netscape provided with Rational Suite, you can access the PDF files with the Adobe Acrobat acroread executable. Also, you should point your browser to the following location to access an HTML page that contains links to all documents (HTML and PDF):
rational_dir/releases/DevelopmentStudioUNIX.2002.05.00/docs/index.html
Note: Netscape Navigator and Adobe Acrobat are installed in the rational_dir/base/cots directory, where rational_dir is the installation path for the Suite.
- 6 The Enter Install Mode menu allows you to decide whether you want rs_install to prompt you before it reinstalls a product, skip a product if it is already installed on your system, or reinstall the product without confirmation.
Verifying Your Installation
It is recommended that you verify that your installation is working properly. This test ensures that both the installation and licensing are working. If you experience any problems, refer to the Administering Licenses, and the Troubleshooting.
Note that Rational Rose, SoDA, and ClearQuest require configuration before actual use. For configuration information, please see the Configuring Rational Rose for UNIX, and the Configuring Rational SoDA of this document. For ClearQuest configuration, please see the ClearQuest Release Notes (HTML) and Installing Rational ClearQuest (PDF) documents.
- 1 Test the UNIX installation and licensing by running Rose and SoDA.
For csh, tcsh, or compatible shells, do the following:
For ksh, bash, or other Korn-compatible shells, do the following:
Note: rs_setup.csh and rs_setup.ksh are setup scripts. For additional information on the setup script see Running the User Setup Script.
Running the User Setup Script
Installation creates two setup scripts which set up the environment to run all the Rational Suite (UNIX Components). These can be used as a common logon for users, and as a convenient point for additional customization.
For csh, tcsh, or compatible shells, source the following from the .cshrc file:
For sh, ksh, bash, and other Bourne-compatible shells, source the following from the .profile file:
Use the aliases summarized in the following table to start a Suite product:
Integrating Products That Are Not Part of the Suite
You may choose to add products that are not part of the Suite after you have installed Rational Suite. The following products are examples:
- Adobe FrameMaker + SGML 5.5 or 6.0 (required to use Rational SoDA)
- Rational Apex
If you answered no to adding any of these products when you ran rs_install, you may install them later and simply run post_install. The post_install command allows you to run a subset of rs_install that includes prompts for integrating other products with Rational Suite.
Setting up Rational RequisiteWeb and Rational ClearQuest Web
If you have installed Rational RequisitePro on Windows, you can give UNIX users access through their browser by pointing to the Rational RequisiteWeb Server.
If you have installed Rational ClearQuest on Windows, you can give UNIX users access through their browser by pointing to the Rational ClearQuest Web Server.
Run the web_setup command to define the URLs for the Rational RequisiteWeb and Rational ClearQuest Web Servers. The web_setup command allows you to run a subset of rs_install and includes the prompts for defining the location of these servers. The server information is recorded in the rpweb and cqweb scripts.
Changing the Primary RUP Variant
After you have installed Rational Suite using rs_install, you can change the primary RUP variant at any time by running the post_install command. This only applies if you have installed more than one RUP variant.
Installing Rational Suite (Windows Components)Rational Suite for UNIX includes several Windows products that you can install and run using your Rational Suite DevelopmentStudio (Windows Components) or Rational Suite DevelopmentStudio RealTime (Windows Components) license key. This group of products is referred to as Windows Components and includes the following point products:
- Rational RequisitePro
- Rational ClearQuest
- Rational TestManager
- Rational Administrator (required for Rational TestManager)
- Web Server Components
- Rational RequisiteWeb
- Rational ClearQuest Web
Note: Unless otherwise specified, Rational Suite (Windows Components) is used to refer to both Rational Suite DevelopmentStudio for UNIX (Windows Components) and Rational Suite DevelopmentStudio RealTime for UNIX (Windows Components).
Before you install the Rational Suite (Windows Components), review the following:
- Are you using a single UNIX server to manage licenses for both the Rational Suite (UNIX Components) and Rational Suite (Windows Components)?
- Are you using a Windows server to manage licenses for the Rational Suite (Windows Components)?
You must install the license server software on the Windows server before you install the Rational Suite (Windows Components). See Installing the Rational License Server Software on Windows.
Important: Back up any user files before starting this procedure. Backing up your data prior to installing any new software should be a regular practice.
Note: You also need to remove any previous versions of Rational Suite (Windows Components) from the target system. For more information, see Removing Rational Suite (Windows Components).
To install the Rational Suite (Windows Components):
- 1 Insert the Rational Solutions for Windows CD into the system's CD-ROM drive.
The setup program should start automatically. If autorun is disabled on the system, click Start > Run. Using the drive letter of the CD-ROM drive, enter drive:\SETUP.EXE.
Note: If you plan to install the Rational Suite (Windows Components) on a system that already has other Windows editions of Rational Suite, the Suite editions must be the same version. You cannot have different versions of the Suite installed on the same system.
- 2 Do one of the following:
- If you are using a Rational Suite DevelopmentStudio (Windows Components) license key, from the drop-down list, click Rational Suite for UNIX (Windows Components).
- If you are using a Rational Suite DevelopmentStudio RealTime (Windows Components) license key, from the drop-down list, click Rational Suite DevelopmentStudio RealTime for UNIX (Windows Components).
Warning: Failure to select the correct product will cause the licensing to fail and the Windows products will be unusable.
- 3 At the Setup Configuration screen, select Custom.
- a
Confirm that Rational ClearQuest, Rational RequisitePro, Rational TestManager, and Web Server Components are selected.- b
Click Next and continue through the installation wizard until complete.Setting Up The License
Before you can use any of the Rational Suite (Windows Components), you need to do one of the following:
- Point to a License Server. (This can be either a UNIX or a Windows system.)
- Import a license file.
- Enter your temporary or evaluation license key information.
To set up your Rational Suite (Windows Components) license:
- 1 The Rational License Key Administrator (LKAD) should automatically start when you restart your system. If not, click the LKAD Wizard button (the button with the Wizard's hat), or click Start > Programs > Rational Suite DevelopmentStudio for UNIX > License Key Administrator.
- 2 Do one of the following:
- If you already have a license server configured, click Point to a Rational License Server to get my licenses. Indicate whether you are using a single license server or a redundant server setup. Enter the server's hostname and port number (optional). Click Finish.
- If you want to use this system as the license server, click Import a Rational License File. Locate the license file (file with a .upd extension) and click Open. Click Finish.
- If you want to get started before you receive your permanent license key, or if you want to evaluate the product, choose Enter a Temporary or Evaluation License Key. (You need your license key certificate to proceed.) Click Floating for the License Key type. Click the appropriate product from the drop-down list: Rational Suite DevelopmentStudio for UNIX (Windows Components) or Rational Suite DevelopmentStudio RealTime for UNIX (Windows Components). Enter the information provided by your license key certificate. Click Finish.
- 3 Check that your Rational Suite (Windows Components) are licensed correctly by starting the products from the Start menu, Start > Program Files > Rational Suite DevelopmentStudio for UNIX.
Configuring and Testing RequisiteWeb
If any Rational RequisiteWeb users are going to access RequisiteWeb through the UNIX version of Netscape Navigator, you will have to do the steps outlined in the Configuring for UNIX Navigator Access topic. After installation, that topic and other configuration information can be found on your RequisitePro server at:
If the HTML documentation files were installed on the UNIX server, the same information can be found at rational_dir/docs/html/reqweb_install/RequisiteWebInstall.html
- 1 Enter the rpweb command on the UNIX host.
rpweb will launch Netscape Navigator, and display the RequisiteWeb URL. If the rpweb command fails, then try sourcing rational_dir/rs_setup.csh.
For csh, tcsh, or compatible shells:
For sh, ksh, bash, and other Bourne-compatible shells:
Another method of testing RequisiteWeb is to invoke Netscape Navigator and point it at the RequisiteWeb URL with the following command.
Installing Rational TestManager and UNIX Test Agent
After you install and license Rational TestManager, you need to install Rational Test Agent on a UNIX system.
Note: The same version of Rational TestManager and Rational Test Agent must be installed on the Local and Agent computers; otherwise, they will not work together.
The UNIX Test Agent is included on the Rational Test Agent CD. For instructions on how to install the UNIX Test Agent, see "Installing Additional Software" in the Rational Testing Products Installation Guide.
Rational Administrator
Before you can use Rational TestManager, you must first create a project in Rational Administrator. For more information, see the Rational Testing Products Installation Guide.
Crystal Reports
Crystal Reports can be used with Rational TestManager to customize or create new report formats from the standard output generated by these two applications.
Crystal Reports is provided on the Crystal Reports Pro Edition CD. To install this product, refer to instructions provided with the CD.
Removing the Rational Suite SoftwareAfter you have installed the latest version of Rational Suite, and after all users have switched to using it, you can remove the old release to reclaim disk space.
Removing Rational Suite (UNIX Components)
Rational Suite includes an uninstall script in its config directory. You can uninstall an earlier release of a product or Suite by running this script in the rational_dir directory.
Before you run uninstall, you must verify that your system startup file has a valid path to the Rational license daemon. See The License Manager. Open this file and search for the string lmgrd.
If the file contains the following pathname, it is correct:
rational_dir/base/cots/flexlm.version/platform
If the pathname does not look like this, you must change the path.
If you have set up the Rose/ClearCase integration on the server running uninstall, you will see a message regarding "rose" and "rose_unit" merge and compare operations. The type manager (or managers) which manage these operations for "rose" and "rose_units" will include links to this release in relation to the merge and compare operations. The messages will include instructions describing how to correct the merge and compare links that become obsolete after uninstalling this release.
With the valid path to the Rational Suite license daemon established, you are ready to run uninstall. Running the script with no command line arguments causes it to display the list of products in the releases directory. You will be prompted for the product or Suite to uninstall. If there is only one product, you will be asked for confirmation before the uninstall takes place. You must be the installer of the product to uninstall it. If you select a Suite, you will be given a chance to review the products in the Suite that would be uninstalled as part of the Suite uninstall. The default action will be to remove all of the point-products and the Suite directory.
If you have installed more than one version of Rational Suite in the same rational_dir directory, the uninstall program will only uninstall the products for a particular Suite if that same product is not a member of another Suite. For example, if Suite 1.0 contains SoDA 3.0.0c and Purify 4.4 and Suite 2.0 contains SoDA 3.0.1 and Purify 4.4, Purify 4.4 is common to both, so it will not be uninstalled until both Suites have been uninstalled. The license software will only be removed when the last Suite using it is removed. In all cases, you can select one or more products in the Suite to be spared from the uninstall operation.
Note: Manually removing the Suite directory does not remove the Suite. The only things in the Suite directory are the Suite documentation, Suite installation tools and Suite data.
Removing Rational Suite (Windows Components)
Use this procedure to remove the Rational Suite (Windows Components).
To remove Rational Suite (Windows Components):
- 1 Click Settings > Control Panel.
- 2 Double-click Add/Remove Programs.
- 3 Do one of the following:
- To remove Rational Suite DevelopmentStudio for UNIX (Windows Components), click Rational Suite DevelopmentStudio for UNIX and click Add/Remove.
- To remove Rational Suite DevelopmentStudio RealTime for UNIX (Windows Components), click Rational Suite DevelopmentStudio RealTime for UNIX and click Add/Remove.
Note: Do not attempt to remove a product by just deleting program directories - there are many registry entries that need to be modified as well.
If you have removed the Rational Suite (Windows Components) and plan to reinstall the components or install a new version, we recommend that you reboot your system after you have removed the software. Once you have rebooted, proceed with the installation.
The Rational Software setup program may install Microsoft Shared components into the Windows 9x System, and Windows NT System32 directories. These Microsoft components are not removed when you remove the Rational Suite (Windows Components). Other programs may use these files; therefore, following Microsoft guidelines, we do not remove them from your system.
In addition, a minimal number of files will remain under the folder <drive>:\Program Files\Rational\. This is intentional so that removing the software does not delete any user files that you may have created while using the products. You can manually delete these files if you want to remove them from your system. Do not delete the entire \Program Files\Rational folder itself unless you are certain that you have uninstalled all products installed from the Rational Solutions for Windows CD (or other Rational product CDs).
Next Steps
- If you plan to set up a Windows license server to administer licenses for Requisite Web, see Installing the Rational License Server Software on Windows.
- If you have Rational ClearCase installed and plan on using it with Rational Rose, you need to set up the Rose/ClearCase integration by following the directions in the Rose on-line help topic "Configuring the Rose for UNIX/ClearCase Integration".
- If you plan to set up your UNIX license server in a redundant configuration, see Setting up Redundant License Servers on UNIX.
- The applications listed in the following table must be configured before you can use them:
| Rational Software Corporation
http://www.rational.com support@rational.com techpubs@rational.com Copyright © 1993-2001, Rational Software Corporation. All rights reserved. |